HOME > Surface Finishing Tutorial > #157 Abrasion Resistance Testing Methods of Platings - 2
Surface Finishing Tutorial
#157 Abrasion Resistance Testing Methods of Platings - 2
Category : Electroplating
April12, 2013
The following method is employed for abrasion resistance testing.
(3) Reciprocating motion abrasion resistance testing
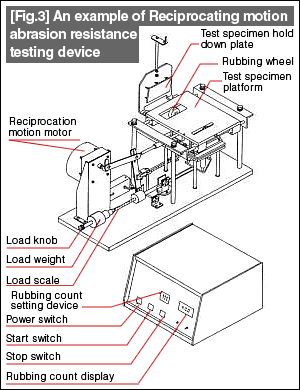
This is an abrasion resistance testing method by using a device as shown in [Fig.3] where rubbing by reciprocating motion is applied between the contact loaded test specimen and abrasive paper pasted wheel.
●Abrasive paper
Abrasive paper CC as defined in JIS R6252 or WA #240~#600 is to be used.
●Test specimen
80mm×80mm flat plate as standard.
●Determine by the following formula based on changes in mass or plating thickness.
|
 |
(4) Twin disc drive abrasion tester (Amsler type abrasion testing)
This is a test method to examine abrasion resistance of platings by applying loads on the test specimen and rubbing wheels with 10% slip ratio in either dry or wet conditions, and applying rolling or sliding friction using a device shown in [Fig.5]
●Test specimen
O.D. 40mm, I.D. 16mm, Thickness 10mm
●Abrasion wheel
The material is selected based on product usage environment.
●Determine based on mass or thickness changes.
Calculated with the following formula.
|
- Environmental conservation
- Hot Dipping
- Anodic Oxidation Process
- Anodic oxidation treatment
- Anodizing
- Corrosion - Corrosion Protection
- Electroless Plating
- Electroplating
- Heat treating
- Hydrogen embrittlement
- Metal cleaning
- Metal etching
- Painting
- Special paints
- Surface Treatment
- Surface-treated steel sheets
- Thermal Spraying


