<?xml version="1.0" encoding="UTF-8"?>
<feed xmlns="http://www.w3.org/2005/Atom">
    <title>Press Dies Tutorial</title>
    <link rel="alternate" type="text/html" href="https://www.misumi-techcentral.com/tt/en/press/" />
    <link rel="self" type="application/atom+xml" href="https://www.misumi-techcentral.com/tt/en/press/atom.xml" />
    <id>tag:www.misumi-techcentral.com,2009-07-09:/tt/en/press//6</id>
    <updated>2013-07-26T00:48:50Z</updated>
    <subtitle>The practical aspects of the design in press technology such as setting the clearances between punches and dies, countermeasures against the rising of chaff in blanking work, etc., are explained. </subtitle>
    <generator uri="http://www.sixapart.com/movabletype/">Movable Type Pro 6.0.3</generator>

<entry>
    <title>#167 Problems in Punching and their Countermeasures (6) Scrap Processing in Punching</title>
    <link rel="alternate" type="text/html" href="https://www.misumi-techcentral.com/tt/en/press/2013/07/167-problems-in-punching-and-their-countermeasures-6-scrap-processing-in-punching.html" />
    <id>tag:www.misumi-techcentral.com,2013:/tt/en/press//4.1099</id>

    <published>2013-07-25T15:00:00Z</published>
    <updated>2013-07-26T00:48:50Z</updated>

    <summary>In punching operations, the processed ma...</summary>
    <author>
        <name>システム管理者</name>
        
    </author>
    
        <category term="Die Design" scheme="http://www.sixapart.com/ns/types#category" />
    
    <category term="diedesign" label="Die Design" scheme="http://www.sixapart.com/ns/types#tag" />
    
    <content type="html" xml:lang="ja" xml:base="https://www.misumi-techcentral.com/tt/en/press/">
        <![CDATA[<p>In punching operations, the processed material is separated into a part that remains on the die and a part that passes through the die and falls down. Every body will carefully handle the one that falls down if it is the final product, but very often people will handle it carelessly if it is just scrap. This frequently causes problems in making improvements. Fig. 1 shows the relationship between the die and the scrap in an example of hole punching operation. The scrap passes through the die and falls down.</p>

<p><img src="http://www.misumi-techcentral.com/tt/en/press/images/167_01.gif" alt="Fig. 1" name="image" width="527" height="180" /></p>

<p>
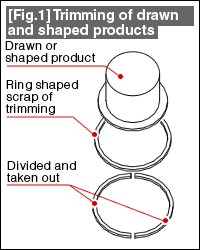
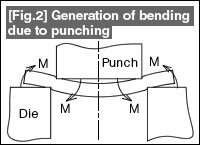
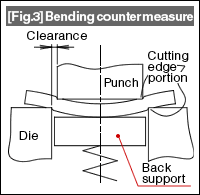
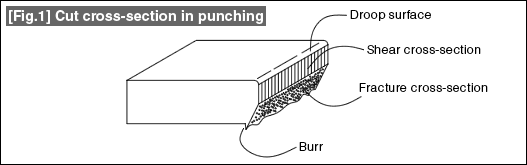
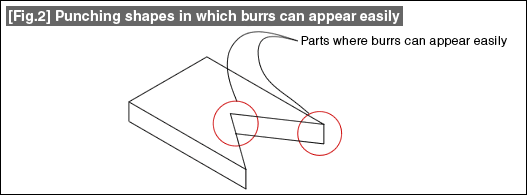
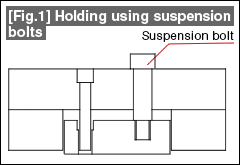
Fig. 2 shows the bolster plate of the press machine.</p>

<p><img src="http://www.misumi-techcentral.com/tt/en/press/images/167_02.gif" alt="Fig. 2" name="image" width="527" height="170" /></p>

<p>
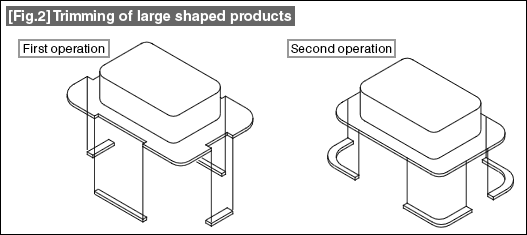
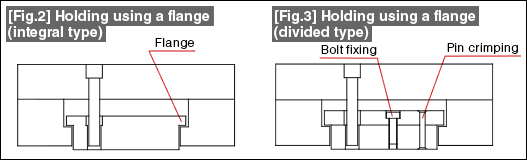
The bottom die of the die set is fixed to this plate. In case there is no die cushion device in the press machine, a scrap dropping hole is opened as shown in the figure. The scrap or the product passes through here and gets collected in the collecting container. Although a square scrap dropping hole has been shown in the figure, round shaped holes are also used. Although it is convenient if the scrap dropping hole is large because then the scrap can fall easily, the support for the die becomes low and holding the die becomes a problem. In terms of holding the die, it is better that the scrap dropping hole is small. Normally, the scrap dropping hole has the cross-sectional shape shown in Fig. 2 (a). When the area where scrap is generated is large such as in progressive forming, etc., as a measure for dropping scrap while maintaining the strength of the bolster plate, there is the method is shown in Fig. 2 (b) in which the hole is made to have a tapered shape and the recovering area is made wider.</p>

<p>
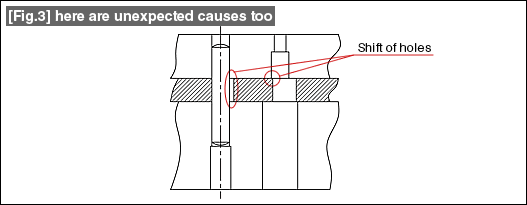
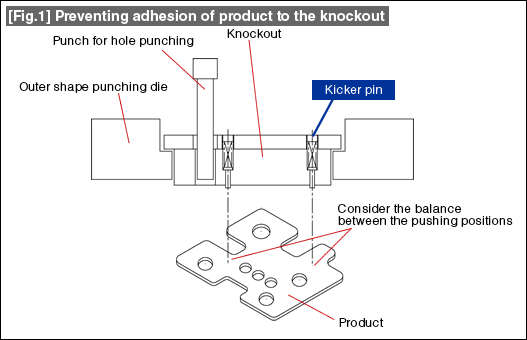
When the press machine is installed with a die cushion, since the die cushion comes at the part where the scrap dropping hole is present, it will not be possible to drop the scrap by passing through the bolster plate. As a result, as shown in Fig. 3, a space for collecting scrap is prepared below the die (collecting the product in some cases). At this time, the plate that is placed below the die is called a "Geta" (in Japanese, meaning wooden clogs) (also called a parallel block, spacer, etc.).</p>

<p><img src="http://www.misumi-techcentral.com/tt/en/press/images/167_03.gif" alt="Fig. 3" name="image" width="527" height="245" /></p>

<p>
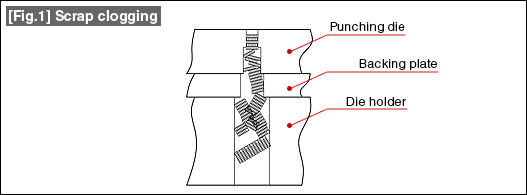
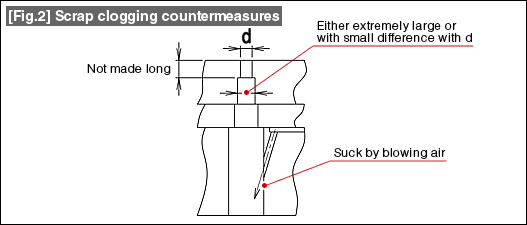
The Geta has the purpose of supporting the die so that it does not become excessively deformed due to the force of forming, and the purpose of preparing a space for collecting scrap (it is also used for adjusting the die height which is the height of the die with respect to the press machine). The scrap that is collected in this space is processed by scraping out from between the Geta. Although this processing is easy if the scrap has a suitably large size, small scraps of hole punching remain on the bolster plate, and cause damage to the bolster plate or die at the time of replacing the die. Sometimes, such scrap gets dispersed in the surroundings creating a bad environment. Because of this, in operations in which the press operating time is long (production quantity is high), instead of scraping out the scrap, it is also taken out by installing a conveyor or a chute. In the case of small quantity production, there is the method of collecting scrap by preparing a scrap collecting container as shown in the figure. While this has the advantages of it being possible to collect hole punching scrap without the scrap being scattered around, on the other hand, if this is used in large quantity production, there is the danger that work is continued without noticing that the container is full, thereby causing breaking the die.</p>

<p>The methods of processing scrap are not uniform, but will have to be planned considering the relationship between the shape and size of scrap and the production quantity.</p>]]>
        
    </content>
</entry>

<entry>
    <title>#166 Problems in Punching and their Countermeasures (5) Trimming of Drawn and Shaped Parts</title>
    <link rel="alternate" type="text/html" href="https://www.misumi-techcentral.com/tt/en/press/2013/07/166-problems-in-punching-and-their-countermeasures-5-trimming-of-drawn-and-shaped-parts.html" />
    <id>tag:www.misumi-techcentral.com,2013:/tt/en/press//4.1098</id>

    <published>2013-07-18T15:00:00Z</published>
    <updated>2013-07-19T00:55:37Z</updated>

    <summary>In drawing or shaping, it is common to p...</summary>
    <author>
        <name>システム管理者</name>
        
    </author>
    
        <category term="Die Design" scheme="http://www.sixapart.com/ns/types#category" />
    
    <category term="diedesign" label="Die Design" scheme="http://www.sixapart.com/ns/types#tag" />
    
    <content type="html" xml:lang="ja" xml:base="https://www.misumi-techcentral.com/tt/en/press/">
        <![CDATA[<p>In drawing or shaping, it is common to prepare the shape while shrinking the outer periphery of the blank. Because of this, the flange edge part after forming will have changed from the shape of the original flange edge part and has an irregular shape. For example, if a cylinder is drawn from a circular blank, very often we see that the flange shape after drawing is not a neat circular shape but is a shape closer to a rectangle. The shape of the edge will be far from the edge shape required in the product and hence trimming will be necessary.</p>

<table width="527" border="0" cellspacing="0" cellpadding="0">
<tr>
<td class="text" align="left" valign="top">
Fig. 1 explains trimming of drawn products. As shown in this figure, the scrap obtained after trimming has the shape of a ring. In this condition, the scrap gets stuck to the punch of the die and cannot be taken out of the die. In order to remove the scrap, it is necessary to divide the scrap into two portions. In the case of small products, the scrap is usually removed by dividing it into two parts.
</td>
<td><img src="http://www.misumi-techcentral.com/tt/en/images/sp.gif" width="12" height="1" border="0" alt="" /></td>
<td align="left" valign="top"><img src="http://www.misumi-techcentral.com/tt/en/press/images/166_01.gif" alt="Fig. 1" name="image" width="200" height="250" /></td>
</tr>
</table>
</br>

<p>If the operation is a single step operation (one shot operation), if the scrap is separated from the die, the processing thereafter is not particularly a problem although it is somewhat cumbersome. However, if the shape of the product becomes large or if trimming is to be done in an intermediate process in transfer forming, it is necessary that the removing of the scrap needs to be done without any problems.</p>

<p>If the product becomes large, the scrap will be too large and even if removed from the die by dividing it into two parts, very often the processing thereafter (recovering by sliding above the chute, etc.,) cannot be done well. It is good that the scrap is made into appropriate sizes that make their processing easy. Fig. 2 shows such an example. The size of the scrap is made small using two steps thereby making the processing easy.</p>

<p><img src="http://www.misumi-techcentral.com/tt/en/press/images/166_02.gif" alt="Fig. 2" name="image" width="527" height="235" /></p>

<p>In shaping operations, attention is given strongly (of course, naturally) to the formed shape, and problems can occur if trimming and scrap processing is taken lightly. Care should be taken about these.</p>]]>
        
    </content>
</entry>

<entry>
    <title>#165 Problems in Punching and their Countermeasures (4) Scrap Clogging in Punching</title>
    <link rel="alternate" type="text/html" href="https://www.misumi-techcentral.com/tt/en/press/2013/07/165-problems-in-punching-and-their-countermeasures-4-scrap-clogging-in-punching.html" />
    <id>tag:www.misumi-techcentral.com,2013:/tt/en/press//4.1097</id>

    <published>2013-07-11T15:00:00Z</published>
    <updated>2013-07-12T01:00:28Z</updated>

    <summary>In punching operations, scrap rising and...</summary>
    <author>
        <name>システム管理者</name>
        
    </author>
    
        <category term="Die Design" scheme="http://www.sixapart.com/ns/types#category" />
    
    <category term="diedesign" label="Die Design" scheme="http://www.sixapart.com/ns/types#tag" />
    
    <content type="html" xml:lang="ja" xml:base="https://www.misumi-techcentral.com/tt/en/press/">
        <![CDATA[<p>In punching operations, scrap rising and scrap clogging can be said to be a double-sided problem. While dent marks on the product caused by scrap rising is a problem, the problem of punching scrap getting clogged in the die will be as shown in Fig. 1.</p>

<p><img src="http://www.misumi-techcentral.com/tt/en/press/images/165_01.gif" alt="Fig. 1" name="image" width="527" height="195" /></p>

<p>Normally, it is likely considered that each punching scrap passes through the die and falls down individually. However, many scrap pieces stick together in the form of a rod due to burrs or the oil used during punching and fall down as rods with some lengths. At this time, depending on the size of the holes through which the scrap falls, the joined scraps may fall inclined in the hole and get struck or stopped inside the hole thereby causing piling up and clogging of the scraps that fall thereafter. In the worst case, this can break the die. Since this cannot be seen from outside, very often one comes to know about the scrap clogging only after the die has broken.</p>

<p>Most often the cause of scrap clogging is due to continuing to punch in a state that is not normal and to use the die even after it has worn and the burrs have become large thereby leading to scrap clogging. While such use cannot be permitted, let us consider the causes and countermeasures. See Fig. 2.</p>

<p><img src="http://www.misumi-techcentral.com/tt/en/press/images/165_02.gif" alt="Fig. 2" name="image" width="527" height="225" /></p>

<p>There are some people who think that by making the cutting edge portion of the punching die long it is possible to use the die for a long time even if regrinding is done during maintenance. In such dies, there is the phenomenon of scrap getting fused to the side wall of the die because the scrap rubs against the side wall of the die when it is passing through the die, which results in scrap clogging. It is better that the length of this part is short with a length enough for about 2 or 3 pieces of scrap to get collected.</p>

<p>Relative to the die hole diameter (d), it is said that scrap clogging can occur easily when the diameter of the escape hole below it is about two times d. The countermeasure is to make the diameter of that hole have a small difference with d. Good effect is obtained by making the cross-section of the hole tapered or stepped. On the extreme side, there is also the method of making the hole very large for the scrap to pass through.</p>

<p>It goes without saying that it is better when the side wall of the hole for the scrap to pass through is smooth rather than rough.</p>

<p>There is also the method of sucking out scrap. We frequently see people using a vacuum cleaner for this purpose. There is also the method in which an inclined hole is drilled in the hole for letting scrap pass through and the scrap is sucked out by blowing air through this inclined side hole. This method is also effective against scrap rising. The trick is to make the inclined hole as upright as possible and to make its diameter small. This is because the sucking force increases when the speed of flow of air is increased and not due to the pressure of air.</p>

<p>There are also some unexpected causes. Such an example is shown in Fig. 3.</p>

<p><img src="http://www.misumi-techcentral.com/tt/en/press/images/165_03.gif" alt="Fig. 3" name="image" width="527" height="205" /></p>

<p>When a dowel pin (knock pin) is inserted in a part constituted by a die plate, a backing plate, and a die holder as shown in this figure, the hole of the backing plate is often drilled with a slightly larger diameter. When this drill hole gets shifted with respect to the dowel pin, scrap clogging occurs if the scrap passing hole of the punched part becomes as shown in the figure. If this is the cause, it is quite difficult to detect hence taking a long time to implement the correct countermeasures. Care should be taken about such problems.</p>]]>
        
    </content>
</entry>

<entry>
    <title>#164 Problems in Punching and their Countermeasures (3) Bending and Twisting of Narrow Punched Parts</title>
    <link rel="alternate" type="text/html" href="https://www.misumi-techcentral.com/tt/en/press/2013/07/164-problems-in-punching-and-their-countermeasures-3-bending-and-twisting-of-narrow-punched-parts.html" />
    <id>tag:www.misumi-techcentral.com,2013:/tt/en/press//4.1096</id>

    <published>2013-07-04T15:00:00Z</published>
    <updated>2013-07-05T01:29:50Z</updated>

    <summary>In a punching operation in which a part ...</summary>
    <author>
        <name>システム管理者</name>
        
    </author>
    
        <category term="Die Design" scheme="http://www.sixapart.com/ns/types#category" />
    
    <category term="diedesign" label="Die Design" scheme="http://www.sixapart.com/ns/types#tag" />
    
    <content type="html" xml:lang="ja" xml:base="https://www.misumi-techcentral.com/tt/en/press/">
        <![CDATA[<p>In a punching operation in which a part of the material with a width near the plate thickness remains, since it is difficult in terms of the strength of the die to punch both the left and right sides at the same time, the left and right portions are punched alternately. When this is done, frequently the shape shown in Fig. 1 is obtained.</p>

<p><img src="http://www.misumi-techcentral.com/tt/en/press/images/164_01.gif" alt="Fig.1" name="image" width="527" height="200" /></p>

<p>During a punching operation, the punching force acting in the plate thickness direction, the sideward force trying to push out laterally, and a bending moment are acting on the material.</br>
If the punching width is large, the sideward force is suppressed and there is no effect on the product after forming. If the width becomes narrow, the material bends because it cannot withstand these forces, and the tip opens up in the case of a cutout shape shown in the figure.</br>
In addition, the cross-section gets twisted and the shape gets deformed as the effect of the bending moment during the punching operation as shown in the cross-section <FONT color="#009933"><B>a−a</B></FONT>.</br>
 As a countermeasure for these problems, the punching width is made wide to more than twice the plate thickness.</p>

<p>When narrow shapes are necessary, as shown in Fig. 2(a), as large a rounding R as possible is provided at the base of the narrow portions. In addition, another method is punching by making the blank holder strong at the narrow punching part. Caution should be exercised because making the blank holder strong can cause reduction in the plate thickness.</br>
As shown in (b), there is also a method in which punching is done of a shape in which the tips of the thin parts are connected, and then the tip part is cut off.</p>

<p><img src="http://www.misumi-techcentral.com/tt/en/press/images/164_02.gif" alt="Fig.2" name="image" width="527" height="250" /></p>

<p>When punching such shapes, the effect is increased if some of the measures are combined together rather than taking only one measure.</p>

<p>Although it was said above that it is not possible to punch the parts to the right and left of a narrow part at the same time, there is a method of punching simultaneously, but in this case the die structure will be special. Another measure is to change the clearance in different parts.</p>

<p>Increase the limits to punching of such shapes by combining various methods.</p>]]>
        
    </content>
</entry>

<entry>
    <title>#163 Problems in Punching and their Countermeasures (2) Bending due to Punching</title>
    <link rel="alternate" type="text/html" href="https://www.misumi-techcentral.com/tt/en/press/2013/06/163-problems-in-punching-and-their-countermeasures-2-bending-due-to-punching.html" />
    <id>tag:www.misumi-techcentral.com,2013:/tt/en/press//4.1093</id>

    <published>2013-06-27T15:00:00Z</published>
    <updated>2013-06-28T00:56:07Z</updated>

    <summary> Bending (also called warping, but here,...</summary>
    <author>
        <name>システム管理者</name>
        
    </author>
    
        <category term="Die Design" scheme="http://www.sixapart.com/ns/types#category" />
    
    <category term="diedesign" label="Die Design" scheme="http://www.sixapart.com/ns/types#tag" />
    
    <content type="html" xml:lang="ja" xml:base="https://www.misumi-techcentral.com/tt/en/press/">
        <![CDATA[<table width="527" border="0" cellspacing="0" cellpadding="0">
<tr>
<td class="text" align="left" valign="top">
Bending (also called warping, but here, the term bending is used to imply deformation only in one axis which is different from bending along the entire circumference) occurs in blanking operations (blank punching, outer shape punching) as shown in Fig. 1.
</td>
<td><img src="http://www.misumi-techcentral.com/tt/en/images/sp.gif" width="12" height="1" border="0" alt="" /></td>
<td align="left" valign="top"><img src="http://www.misumi-techcentral.com/tt/en/press/images/163_01.gif" alt="Fig.1" name="image" width="200" height="190" /></td>
</tr>
</table>
</br>

<table width="527" border="0" cellspacing="0" cellpadding="0">
<tr>
<td class="text" align="left" valign="top">
In the initial stage of a punching operation, the material gets deformed into a shape as shown in Fig. 2. A force (bending moment) acts on the punch and the die so as to bend the material at the clearance. Because of this, the material gets twisted and gets bent.</br>
</br>
If this bending stress does not exceed the elastic region of the material being formed, when the blank is separated from the die it returns to its original shape. If the bending stress exceeds the elastic region of the material and gets into the plastic region, the bending remains even when the blank is separated from the die.</br>
</br>
The bending becomes large as the clearance becomes large. This is because the distance between the two points increases where the force operates to twist the material. In a similar manner, this also occurs even when the cutting edges of the punch and the die wear out and become rounded.
</td>
<td><img src="http://www.misumi-techcentral.com/tt/en/images/sp.gif" width="12" height="1" border="0" alt="" /></td>
<td align="left" valign="top"><img src="http://www.misumi-techcentral.com/tt/en/press/images/163_02.gif" alt="Fig.2" name="image" width="200" height="145" /></td>
</tr>
</table>
</br>

<table width="527" border="0" cellspacing="0" cellpadding="0">
<tr>
<td class="text" align="left" valign="top">
The clearance is made small as a countermeasure in order to make the bending small. Carry out regrinding of the punch and die earlier thereby reducing the forming using worn cutting edges. This can be said to be the countermeasure in the common dies. (See Fig. 3)</br>
</br>
As a more positive countermeasure, since it is good if the bending is suppressed, there is the method of incorporating in the die a back support such as that shown in Fig. 3.
</td>
<td><img src="http://www.misumi-techcentral.com/tt/en/images/sp.gif" width="12" height="1" border="0" alt="" /></td>
<td align="left" valign="top"><img src="http://www.misumi-techcentral.com/tt/en/press/images/163_03.gif" alt="Fig.3" name="image" width="200" height="195" /></td>
</tr>
</table>
</br>

<p>The metal forming method of punching can be said to have a die structure with which it is easy for bending to occur. In the technique shown in Fig. 4 in which the part that becomes the scrap is removed and the product is left on the die, since it is possible to carry out the forming while constantly pressing the material, it is possible to make bending small (in this case, even warping can be made small). This method is being used widely in the case of products in which a high degree of flatness is required.</p>

<p><img src="http://www.misumi-techcentral.com/tt/en/press/images/163_04.gif" alt="Fig.4" name="image" width="527" height="135" /></p>]]>
        
    </content>
</entry>

<entry>
    <title>#162 Problems in Punching and their Countermeasures (1) Punching Burrs</title>
    <link rel="alternate" type="text/html" href="https://www.misumi-techcentral.com/tt/en/press/2013/06/162-problems-in-punching-and-their-countermeasures-1-punching-burrs.html" />
    <id>tag:www.misumi-techcentral.com,2013:/tt/en/press//4.1092</id>

    <published>2013-06-20T15:00:00Z</published>
    <updated>2013-06-21T06:15:27Z</updated>

    <summary>In common punching operations, the cut s...</summary>
    <author>
        <name>システム管理者</name>
        
    </author>
    
        <category term="Die Design" scheme="http://www.sixapart.com/ns/types#category" />
    
    <category term="diedesign" label="Die Design" scheme="http://www.sixapart.com/ns/types#tag" />
    
    <content type="html" xml:lang="ja" xml:base="https://www.misumi-techcentral.com/tt/en/press/">
        <![CDATA[<p>In common punching operations, the cut surface is formed in the material in the sequence of droop → shear cross-section → fracture cross-section → burr, as shown in Fig. 1.</p>

<p><img src="http://www.misumi-techcentral.com/tt/en/press/images/162_01.gif" alt="Fig. 1" name="image" width="527" height="165" /></p>

<p>When a soft steel plate (SPC steel) which is used most frequently in press forming is cut with a standard clearance, the length of the shear cross-section becomes about 1/3 of the material plate thickness, and the height of the burr becomes about 0.03 to 0.05. In case this amount of burrs is considered to be within normal tolerable range, this was called "return" thereby distinguishing it from abnormalities.</p>

<p>However, due to the product liability laws in recent years, even a small burr is considered to be a cause of scratch injury to hands or fingers, and it is being required more and more frequently that the burrs be removed by surface flattening.</p>

<p>Burrs should be made extremely small. Depending on the material being formed, the manner in which burrs appear differs. Burrs can occur easily in the case of soft materials because their elongation is large. Therefore, the punching clearance is made small. Since hard materials can break easily (brittle), there is no problem even if the clearance is made larger (the punching force becomes smaller as the clearance becomes larger). In the case of brasses, increasing the amount of zinc makes the elongation smaller and the material more brittle. The amount of zinc is controlled as a countermeasure in punching.</p>

<p>Burrs become small when an appropriate clearance is used. Therefore, the clearance is set so that it becomes uniform for the shape being punched. This is the basic attitude when preparing a punching die. However, even if a uniform clearance is set, there are shapes in which burrs appear quickly. As shown in Fig. 2, this is pronounced at the apexes of sharp projection or recess parts, which are followed by corners that do not have rounding.</p>

<p><img src="http://www.misumi-techcentral.com/tt/en/press/images/162_02.gif" alt="Fig. 2" name="image" width="527" height="195" /></p>

<p>The cause of this is the chipping of the corners of the punch or the die. Chipping occurs due to combined effects of the shape and the punching conditions. Even when an appropriate clearance is used, the punching conditions are bad in the corner parts (the punching conditions will be similar to when the clearance is small), and the cut surface will not be normal. The countermeasure is to make sure that the punching conditions are the same as in the straight line parts. There are two methods for this, one of which is to round the corners (corners with an R of 1/2 of the material plate thickness or more), and the other is to increase the clearance.</p>

<p>Burrs are also generated due to the relationship between the punch and the die. This is shown in Fig. 3.</p>

<p><img src="http://www.misumi-techcentral.com/tt/en/press/images/162_03.gif" alt="Fig. 3" name="image" width="527" height="220" /></p>

<p>Lopsided and twisted clearances are the commonly found phenomena.</p>

<p>The checking of the clearance of a punching die can be made by punching a paper or vinyl sheet. A paper or vinyl sheet is placed on the die, the punch is stopped just when it has entered into the die by a very small amount, and the condition of punching of the paper or vinyl sheet is inspected. The parts that have been cut neatly are the parts where the clearance is small. The clearance is large where the fibers of the paper are remaining uncut or where the vinyl sheet has been cut so that it is stretched. Adjust so that the cutting is uniform.</p>

<p>Apart from the above, there are other causes of burr generation. The above are only the typical causes of burrs.</p>]]>
        
    </content>
</entry>

<entry>
    <title>#161 Design of Compound Punching Dies (10) Stripper and Material Guide</title>
    <link rel="alternate" type="text/html" href="https://www.misumi-techcentral.com/tt/en/press/2013/06/161-design-of-compound-punching-dies-10-stripper-and-material-guide.html" />
    <id>tag:www.misumi-techcentral.com,2013:/tt/en/press//4.1091</id>

    <published>2013-06-13T15:00:00Z</published>
    <updated>2013-06-14T01:12:01Z</updated>

    <summary>The material guide in a compound punchin...</summary>
    <author>
        <name>システム管理者</name>
        
    </author>
    
        <category term="Die Design" scheme="http://www.sixapart.com/ns/types#category" />
    
    <category term="diedesign" label="Die Design" scheme="http://www.sixapart.com/ns/types#tag" />
    
    <content type="html" xml:lang="ja" xml:base="https://www.misumi-techcentral.com/tt/en/press/">
        <![CDATA[<p>The material guide in a compound punching die is discussed in this tutorial. Fig. 1 shows the state in which forming is being done using a compound punching die. The cross-section of the corresponding bottom die structure is shown in Fig. 2.</p>

<p><img src="http://www.misumi-techcentral.com/tt/en/press/images/161.gif" alt="Fig. 1, Fig. 2" name="image" width="527" height="245" /></p>

<p>The material moves above the stripper plate. The width guide of the material is frequently constituted by a round rod, etc., placed only on one side. This is in order to be compatible with changes in the material width and because it would be convenient while taking out the product.</br>
In specific terms, in the case of forming with fixed length materials and when the product is large and falls down after being ejected from the top die above on to the material on the bottom die, the product on the material is blown so that it falls outside the die and can be collected. Since this type of operation becomes difficult to carry out if the material width is firmly guided, it is common to guide the material along the width direction only on one side.</br>
There is also the intention of eliminating the need to put a hand inside the die to take out the product.</br>
There is no problem even if the material is firmly guided along its width if the product has a size that makes it possible to be blown away by an air blast.</p>

<p>The positioning in the feeding direction is done by a stop pin. A stop pin is not necessary when forming using a feeding device that feeds a coil material for forming. But a stop pin is necessary when fixed length material is being worked manually. A stop pin is placed at a position where the shape is stable. Very often the stop pin is made of the movable type.</p>

<p>In compound punching, measures are taken so that some slight variations in the positioning do not cause any problems by having a slightly wider bridge than in blanking.</p>

<p>The stripper surface is made about 0.5 mm to 1.0 mm higher than the outer shape punching punch surface so that the material feeding is not obstructed. The hole in the stripper in which the punch for outer shape punching passes through is not matched exactly as in the relationship between the die hole and the knockout, but escapes are provided in some parts thereby ensuring that there is no occurrence of fusing of biting of the punch for outer shape punching and the stripper.</p>

<p>The stripper has the functions of both stripping and lifting.</p>]]>
        
    </content>
</entry>

<entry>
    <title>#160 Design of Compound Punching Dies (9) Design of a Knockout - 4</title>
    <link rel="alternate" type="text/html" href="https://www.misumi-techcentral.com/tt/en/press/2013/06/160-design-of-compound-punching-dies-9-design-of-a-knockout---4.html" />
    <id>tag:www.misumi-techcentral.com,2013:/tt/en/press//4.1090</id>

    <published>2013-06-06T15:00:00Z</published>
    <updated>2013-06-07T05:01:32Z</updated>

    <summary>A compound punched product is in the sta...</summary>
    <author>
        <name>システム管理者</name>
        
    </author>
    
        <category term="Die Design" scheme="http://www.sixapart.com/ns/types#category" />
    
    <category term="diedesign" label="Die Design" scheme="http://www.sixapart.com/ns/types#tag" />
    
    <content type="html" xml:lang="ja" xml:base="https://www.misumi-techcentral.com/tt/en/press/">
        <![CDATA[<p>A compound punched product is in the state in which it has been pushed inside the die and is pushed up by the knockout, but is staying inside the die due to the force of friction with the die. In Tutorial <a href="http://www.misumi-techcentral.com/tt/en/press/2013/4/154_design_of_compound_punching_dies_3_taking_out_a_product_in_compound_punching_knockout.html" target="_blank">#154</a>, we have explained the relationship between the press machine and the knockout. Please refer also to that tutorial and read the following.</p>

<p>In the shape shown in Fig. 1, since there is a gap at the center of the knockout, it is possible to press the knockout directly with the knockout rod. If it is possible to adopt this method, it is possible to simplify the die structure.</p>

<p><img src="http://www.misumi-techcentral.com/tt/en/press/images/160_01.gif" alt="Fig. 1" name="image" width="527" height="235" /></p>

<p>If the knockout rod is stepped and is pushed too abnormally, the knockout is prevented from being affected because the step in the knockout rod receives that abnormal push. In addition, even when there is no abnormality, a slight gap is provided between the knockout and the tip of the knockout rod so that the knockout is not pushed more than necessary. The size of this gap is less than the length by which the knockout comes out of the die surface (see Tutorial <a href="http://www.misumi-techcentral.com/tt/en/press/2013/5/158design_of_compound_punching_dies_7_design_of_a_knockout_-_2.html" target="_blank">#158</a>).</p>

<p>The precaution in this method of pushing at the center is that even the positions of the holes in the product should be balanced. A lopsided placement of holes wherein the holes are more in some parts is not good because then a force will always act to make the knockout get tilted. In such shapes, it is necessary to adopt the method shown below.</p>

<p>Fig. 2(a) shows the most commonly used structure for driving a knockout. Several knockout pins are provided considering the balance between the shape of the product and the placement of holes so as to push down the product in a balanced manner. In Tutorial #160, even in the method of supporting the knockout by suspension bolts, the placement of the suspension bolts is also made as per the above description.</p>

<p>Even in this case, the knockout pin is made slightly short thereby ensuring that the knockout is not pushed too much.</p>

<p>The knockouts will be placed in a circular fashion when forming round shapes such as washers, etc, and three or four pins are positioned as shown in Fig. 2(b).</p>

<p><img src="http://www.misumi-techcentral.com/tt/en/press/images/160_02.gif" alt="Fig. 2" name="image" width="527" height="330" /></p>

<p>The knockout pin transfers the force of the knockout rod via the knockout plate. The knockout plate can get warped if it is too thin. Take care about this.</p>

<p>It goes without saying that the lengths of all knockout pins are the same.</p>]]>
        
    </content>
</entry>

<entry>
    <title>#159 Design of Compound Punching Dies (8) Design of a Knockout - 3</title>
    <link rel="alternate" type="text/html" href="https://www.misumi-techcentral.com/tt/en/press/2013/05/159-design-of-compound-punching-dies-8-design-of-a-knockout---3.html" />
    <id>tag:www.misumi-techcentral.com,2013:/tt/en/press//4.1071</id>

    <published>2013-05-30T15:00:00Z</published>
    <updated>2013-05-31T00:52:49Z</updated>

    <summary>The method of preventing a knockout from...</summary>
    <author>
        <name>システム管理者</name>
        
    </author>
    
        <category term="Die Design" scheme="http://www.sixapart.com/ns/types#category" />
    
    <category term="diedesign" label="Die Design" scheme="http://www.sixapart.com/ns/types#tag" />
    
    <content type="html" xml:lang="ja" xml:base="https://www.misumi-techcentral.com/tt/en/press/">
        <![CDATA[<p>The method of preventing a knockout from falling down.</p>

<table width="527" border="0" cellspacing="0" cellpadding="0">
<tr>
<td class="text" align="left" valign="top">
In the case of a large product, as shown in Fig. 1, several tapped holes made inside the knockout, and the knockout is held by screwing suspension bolts (stripper bolts) into these tapped holes. If this method is used, the design of the die becomes considerably easy. Even the preparation of the die becomes easy because there is no turning upside down of the die. For the purpose of preventing breakage of the suspension bolts, it is necessary to use as thick screws as possible, and to retighten the bolts frequently.</td>
<td><img src="http://www.misumi-techcentral.com/tt/en/images/sp.gif" width="12" height="1" border="0" alt="" /></td>
<td align="left" valign="top"><img src="http://www.misumi-techcentral.com/tt/en/press/images/159_01.gif" alt="Fig. 1" name="image" width="240" height="165" /></td>
</tr>
</table>
</br>

<p>In the case of a round shape or a simple shape, a flange is provided at a part of or all around the knockout and the knockout is prevented from falling down by this flange (see Fig. 2).</p>

<p><img src="http://www.misumi-techcentral.com/tt/en/press/images/159_02.gif" alt="Fig. 2, Fig. 3" name="image" width="527" height="160" /></p>

<p>Since a knockout is usually hardened, even the flange part becomes hardened. Since this makes it brittle, if the flange portion is thin, it can easily break due to repeated movements, and hence care should be taken to design the flange to be somewhat thick, and to suppress the hardening to about 56HRC.</p>

<p>If the shape of the knockout becomes complex, the body of the knockout and the flange portion are prepared separately and are used by combining them together. The combining is done using screws if there is enough space for tapping threads. In the case of small shapes, the combining is done by passing a pin through them, and then crimping both ends of the pin.</p>

<p>In this method, the body portion is hardened, and the flange portion is used without hardening thereby taking measures against breaking. If the flange portion is thin, care should be taken because the plate of the flange gets warped with use.</p>

<p>In the method of using a flange, since the strength of the die is affected if the flange is made too big, the size should be designed considering the balance with the size of the product so that there is no excessiveness.</p>]]>
        
    </content>
</entry>

<entry>
    <title>#158 Design of Compound Punching Dies (7) Design of a Knockout - 2</title>
    <link rel="alternate" type="text/html" href="https://www.misumi-techcentral.com/tt/en/press/2013/05/158design-of-compound-punching-dies-7-design-of-a-knockout---2.html" />
    <id>tag:www.misumi-techcentral.com,2013:/tt/en/press//4.1070</id>

    <published>2013-05-23T15:00:00Z</published>
    <updated>2013-05-24T01:05:50Z</updated>

    <summary>The knockout is always in contact with t...</summary>
    <author>
        <name>システム管理者</name>
        
    </author>
    
        <category term="Die Design" scheme="http://www.sixapart.com/ns/types#category" />
    
    <category term="diedesign" label="Die Design" scheme="http://www.sixapart.com/ns/types#tag" />
    
    <content type="html" xml:lang="ja" xml:base="https://www.misumi-techcentral.com/tt/en/press/">
        <![CDATA[<p>The knockout is always in contact with the blank material. The material is often coated with cutting oil, and due to this oil the material adheres closely to the knockout, and even after the product is ejected from the die it sticks to the surface of the knockout, leading to the problem of double product punching (the problem of punching the material again with a product remaining stuck on the knockout), which can break the die. This phenomenon is a kind of trouble that cannot be prevented even when the operator is being cautious. It is preferable to take countermeasures for this in the structure of the die.</p>

<p>As shown in Fig. 1, adhesion of the material to the knockout is prevented by providing a kicker pin in the knockout. When only one kicker pin is provided, it is positioned at the center of gravity, and when several kicker pins are provided, they are positioned considering the balance among them.</p>

<p><img src="http://www.misumi-techcentral.com/tt/en/press/images/158_01.gif" alt="Fig. 1" name="image" width="527" height="340" /></p>

<p>　The amount of projection of the kicker pin is about 0.5 mm to 1.0 mm. Even when the product is collected using an air blow, since the form in which the product is separated from the knockout is the same, the direction of flying of the product becomes stable. In the case of a kicker pin with a large amount of projection, the tip of the pin can get caught in a hole in the product when the product is flying away thereby leading to an accident. Therefore, it is preferable to use a smaller amount of projection.</p>

<p>It is not good to make the outer shape of the knockout become completely identical to the shape of the die. The metal shreds, etc., that are generated during the punching operation get inside the gap between the knockout and the die, thereby causing fusing between them. This may also cause the movement of the knockout to become not smooth.</p>

<p>As shown in Fig. 2, the guiding is done by a surface with a stable shape (linear parts, etc.), detailed shape portions or corners are provided with escapes by providing R or C chamfering thereby reducing the parts that can cause problems.</p>

<p><img src="http://www.misumi-techcentral.com/tt/en/press/images/158_02.gif" alt="Fig. 2" name="image" width="527" height="295" /></p>

<p>In the escapes for the rounded (R) portions, it is better that the projecting R portions are not escaped by making the rounding R shape small, but by C surfaces. The recess R portions are escaped by providing corners or small R. It is also good to provide escapes in the middle of long straight line portions.</p>]]>
        
    </content>
</entry>

<entry>
    <title>#157 Design of Compound Punching Dies (6) Design of a Knockout - 1</title>
    <link rel="alternate" type="text/html" href="https://www.misumi-techcentral.com/tt/en/press/2013/05/157-design-of-compound-punching-dies-6-design-of-a-knockout---1.html" />
    <id>tag:www.misumi-techcentral.com,2013:/tt/en/press//4.1069</id>

    <published>2013-05-16T15:00:00Z</published>
    <updated>2013-05-17T00:45:17Z</updated>

    <summary>As shown in Fig. 1, a knockout is assemb...</summary>
    <author>
        <name>システム管理者</name>
        
    </author>
    
        <category term="Die Design" scheme="http://www.sixapart.com/ns/types#category" />
    
    <category term="diedesign" label="Die Design" scheme="http://www.sixapart.com/ns/types#tag" />
    
    <content type="html" xml:lang="ja" xml:base="https://www.misumi-techcentral.com/tt/en/press/">
        <![CDATA[<p>As shown in Fig. 1, a knockout is assembled inside the die. A compound die has the inverted placement structure in which the die for outer shape punching is the top die (goes up and down along with the slide of the press machine) and the punch for outer shape punching is the bottom die (fixed on the bolster plate side of the press machine). A knockout is a characteristic part of this structure.</p>

<p><img src="http://www.misumi-techcentral.com/tt/en/press/images/157_01.gif" alt="Fig.1" name="image" width="527" height="310" /></p>

<p>A knockout has two roles, that is, the role of a stripper of a hole punching punch and the role of ejecting the product that has entered inside the die. Normally, a knockout is prepared with the same shape as that of the product.</br>
As shown in Fig. 2, the surface of the knockout is either made level with the die surface or is made to project slightly beyond it. The amount of projection is about 0.5 mm to 1.0 mm. Contrary to common assumption, it is very rare that its surface is made level with the surface of the die.</p>

<p><img src="http://www.misumi-techcentral.com/tt/en/press/images/157_02.gif" alt="Fig.2" name="image" width="527" height="100" /></p>

<p>When the knockout has moved by the maximum amount inside the die, as shown in Fig. 3(a), care should be taken so that the cutting edge of the die does not get separated, or the stepped part of the hole punching punch does not hit against the reverse side of the knockout.</br>
As shown in Fig. 3(b), when the knockout gets separated from the cutting edge of the die, in some rare cases, the knockout can become immovable because it has got stuck to the underside of the cutting edge of the die, and hence causing the die to break.</br>
In addition, the interference between the stepped part of the hole punching punch and the hole of the knockout can lead to breakage of the knockout or of the punch.</p>

<p><img src="http://www.misumi-techcentral.com/tt/en/press/images/157_03.gif" alt="Fig.3" name="image" width="527" height="280" /></p>]]>
        
    </content>
</entry>

<entry>
    <title>#156 Design of Compound Punching Dies (5) Structure of a Compound Punching Punch</title>
    <link rel="alternate" type="text/html" href="https://www.misumi-techcentral.com/tt/en/press/2013/05/156-design-of-compound-punching-dies-5-structure-of-a-compound-punching-punch.html" />
    <id>tag:www.misumi-techcentral.com,2013:/tt/en/press//4.1068</id>

    <published>2013-05-09T15:00:00Z</published>
    <updated>2013-05-10T01:00:04Z</updated>

    <summary>In compound punching, the shape of the p...</summary>
    <author>
        <name>システム管理者</name>
        
    </author>
    
        <category term="Die Design" scheme="http://www.sixapart.com/ns/types#category" />
    
    <category term="diedesign" label="Die Design" scheme="http://www.sixapart.com/ns/types#tag" />
    
    <content type="html" xml:lang="ja" xml:base="https://www.misumi-techcentral.com/tt/en/press/">
        <![CDATA[<p>In compound punching, the shape of the product (Fig. 1) and the shape of the compound punching punch (Fig. 2) appear identical to the eye.</br>
The outline shape of the punch becomes the punch for outer shape punching. Relative to the dimensions of the outline of the product, the outline shape of the punch is prepared to be smaller by the clearance between them.</br>
The holes inside the punch are the hole punching dies. They are made smaller by the amount of the clearance with respect to the hole dimensions of the product. The precautions about the drop hole for scrap are the same as in hole punching operations.</br>
Since any scrap getting clogged can immediately cause breakage, the cutting edge of the die is made shorter. When there are several holes that are close to each other, the holes are combined into a single larger hole in the middle so as to make it into a drop hole for scrap and obtaining a structure in which scrap clogging does not occur easily.</p>

<p><img src="http://www.misumi-techcentral.com/tt/en/press/images/156_01.gif" alt="Fig. 1, Fig. 2" name="image" width="527" height="210"></p>

<table width="527" border="0" cellspacing="0" cellpadding="0">
<tr>
<td class="text" align="left" valign="top">
If the drop hole for scrap is made wide in the case of small shapes, the thicknesses of the side walls become smaller causing the die to break easily. Hence, a countermeasure is taken such as providing a stepped shape as shown in Fig. 3. In the case of odd shaped punches, these are also prepared by chamfering machining or reverse electrical discharge machining. The thinking in this regard is determined according to the design of the punch.
</td>
<td><img src="http://www.misumi-techcentral.com/tt/en/images/sp.gif" width="12" height="1" border="0" alt="" /></td>
<td align="left" valign="top"><img src="http://www.misumi-techcentral.com/tt/en/press/images/156_02.gif" alt="Fig.3" name="image" width="130" height="185" /></td>
</tr>
</table>
</br>

<p>A method of fixing the compound punch is to fix using screws by drilling and tapping holes in the punch if the shape is large.</br>
When machined straight by wire electrical discharge machining, grooves are machined in the side walls by grinding, and fixing by keys is done using those grooves, or else, a part of the outer shape is wire-machined large, and that part is later ground to form a flange. The method of fixing the punch is the same as the method of fixing a blanking punch.</br>
The material of the punch is commonly SDK11 heat treated to about 60HRC.</p>]]>
        
    </content>
</entry>

<entry>
    <title>#155 Design of Compound Punching Dies (4) Structure of a Compound Punching Die</title>
    <link rel="alternate" type="text/html" href="https://www.misumi-techcentral.com/tt/en/press/2013/04/155-design-of-compound-punching-dies-4-structure-of-a-compound-punching-die.html" />
    <id>tag:www.misumi-techcentral.com,2013:/tt/en/press//4.1067</id>

    <published>2013-04-25T15:00:00Z</published>
    <updated>2013-04-26T00:58:19Z</updated>

    <summary>The basic structure of a compound punchi...</summary>
    <author>
        <name>システム管理者</name>
        
    </author>
    
        <category term="Die Design" scheme="http://www.sixapart.com/ns/types#category" />
    
    <category term="diedesign" label="Die Design" scheme="http://www.sixapart.com/ns/types#tag" />
    
    <content type="html" xml:lang="ja" xml:base="https://www.misumi-techcentral.com/tt/en/press/">
        <![CDATA[<p>The basic structure of a compound punching die is shown in Fig. 1.</p>

<p><img src="http://www.misumi-techcentral.com/tt/en/press/images/155_01.gif" alt="Fig.1" name="image" width="527" height="300" /></p>

<p>The compound punching die is used for compound forming operations (outer shape punching and hole punching). The method of preparing the structure of compound forming has been explained in Tutorial <a href="http://www.misumi-techcentral.com/tt/en/press/2009/08/008-method-of-preparing-compound-die-structures.html" target="_blank">No. 8</a> "Method of Preparing Compound Die Structures". After that, "Structure of Compound Dies" has been explained in Tutorial <a href="http://www.misumi-techcentral.com/tt/en/press/2010/03/031-basics-of-die-structure-6-structure-of-compound-dies.html" target="_blank">No. 31</a>. Please refer to these tutorials.</br>
In this tutorial, explanations are given about further detailed items.</p>

<p>Depending on the die, the plate configuration that constitutes the die becomes extremely important. This is because it affects the cost of the die.
The plate configuration of a compound die has seven plates (fig.1). The die plate becomes somewhat thick because it is necessary to assemble the knockout inside it.
</br>
When the punch is large, sometimes the punch plate is not used but the fixing is done directly to the die holder.</p>

<TABLE border="0" cellspacing="0" cellpadding="0">
<!-- block-->
<tr valign="top"><td class="attention" style="color: #990000; font-size: 10px;">※</td><td class="attention" style="color: #990000; font-size: 10px;">The structure of a compound die is the inverted placement structure. In the inverted placement structure, the punch is placed below and the die is placed above (for outer shape punching). Some of you may feel that there is something strange in the relationship between the punch holder and the die holder, but the holder that is attached to the slide of the press machine is taken as the punch holder, and the holder that is attached to the bolster is taken as the die holder.</td></tr>
<!-- /block-->
</table>
</br>

<p>When handling small product shapes, sometimes a backing plate is also used below the punch plate for the outer shape punching by the bottom die. Eliminating the backing plate for hole punching by the top die is very rare.</br>
The materials of the respective plates are given below.</br>
Punch, die holder, and punch plate: S50C or SS400</br>
Backing plate: SK3 to SK5</br>
Punch, die plate: SK33 or SKD11</br>
</p>

<p>Fig. 2 shows a plate configuration in which the die plate is divided into two.</p>

<p><img src="http://www.misumi-techcentral.com/tt/en/press/images/155_02.gif" alt="Fig.2" name="image" width="527" height="328"></p>

<p>This is used when the underside counter boring for the knockout is cumbersome, or when it is wanted to save the material of the die plate.</br>
Although the name of the plate produced out of dividing is called here as the spacer plate, it is also called by other names such as "play plate", etc. Since this plate is for making the knockout movable, the material used is S50C or SS400.</br>
Since the number of plates becomes large in a die for compound punching, sometimes the die is prepared with some special techniques in its design. This is the method used when the die is prepared by wire cut electric discharge machining.</br>
If the die plate is prepared by wire cut electric discharge machining, although the material inside the die is cut away, this material is used as the punch. With one single plate, it is possible to prepare the punch and the die. When the plate is thin, the die is prepared using taper machining of wire cut electric discharge machining.</p>

<p>Similarly, at the time of preparing the stripper plate, the material that is cut away is used as the knockout. If such techniques are used, while the die material can be saved, at the same time, even the preparation of the die becomes faster. This is suitable for the production of small volumes.</br>
The number of plates becomes large in the top die of a compound punching die. Although this is a method of using bolts and dowel pins (knockouts) as was shown by "fastening A" in Fig. 1, the number of penetrating plates is large and hence one might feel that there are problems in reliability. This is more so when a spacer plate is used. As shown by "Fastening B" and "Fastening C" in Fig. 2, in some cases, the die plate and the punch plate for hole punching are integrated together, and the fastening as the top die is made separate.</br>
While the dowel pin is the component that determines the positional relationship, the reliability becomes poor as the pin becomes longer. It is considered good if the number of plates that the dowel pin penetrates is about three.</p>

<p>The method of fastening and the work of assembling the die are related to each other. It is necessary to select the fastening considering the fastening of plates as well as the operation of pierce punch spotting of the die.</p>]]>
        
    </content>
</entry>

<entry>
    <title>#154 Design of Compound Punching Dies (3) Taking out a Product in Compound Punching (Knockout)</title>
    <link rel="alternate" type="text/html" href="https://www.misumi-techcentral.com/tt/en/press/2013/04/154-design-of-compound-punching-dies-3-taking-out-a-product-in-compound-punching-knockout.html" />
    <id>tag:www.misumi-techcentral.com,2013:/tt/en/press//4.1066</id>

    <published>2013-04-18T15:00:00Z</published>
    <updated>2013-04-19T01:07:42Z</updated>

    <summary>The die structure in compound punching i...</summary>
    <author>
        <name>システム管理者</name>
        
    </author>
    
        <category term="Press Machine, Peripheral Equipment" scheme="http://www.sixapart.com/ns/types#category" />
    
    <category term="peripheralequipment" label="Peripheral Equipment" scheme="http://www.sixapart.com/ns/types#tag" />
    <category term="pressmachine" label="Press Machine" scheme="http://www.sixapart.com/ns/types#tag" />
    
    <content type="html" xml:lang="ja" xml:base="https://www.misumi-techcentral.com/tt/en/press/">
        <![CDATA[<p>The die structure in compound punching is shown in Fig. 1. This is a structure in which the die for outer shape punching (blanking) is in the top die. This type of a structure is called an "inverted placement structure".</br>
In the inverted placement structure, the product after outer shape punching enters the die in the top die. Since the top die is attached to the slide of the press machine and carries out up and down movement, if the product that has entered the die is not ejected well, it can lead to breaking of the die. The die component for ejecting the product that has entered into the die is called a knockout. This is a characteristic component of the inverted placement structure. Although the inverted placement structure is used quite often for drawing other than punching operations, the work of the knockout is the same.</p>

<p><img src="http://www.misumi-techcentral.com/tt/en/press/images/154_01.gif" alt="Fig. 1" name="image" width="527" height="265" /></p>

<h4>(1) Knockout structure of the die</h4>

<p>Recently, the action of taking out a product from the die is very often called as "ejecting". However, this action is frequently called "knocking out" in press forming operations. Either way is acceptable. However, the die component used for this action is called a "knockout".</br>
The structure of a knockout is explained using Fig. 1. The knockout is present inside the die. The knockout is prepared in almost the same shape as the die. A flange, etc., is provided to prevent it from falling off.</br>
When the outer shape is punched from the material, the knockout is pushed up along with the removed material.</br>
Near the top dead center, the knockout is pushed from behind, and returns to the shape before carrying out the outer shape punching, thereby ejecting the product.</br>
The components pushing the knockout from behind are the knockout pin, knockout plate, and knockout rod. Depending on the structure of the die, sometimes the structure is such that the knockout is pushed directly by the knockout rod.</br>
The press machine applies force to the knockout rod.</p>

<h4>(2) Relationship between the knockout and the press machine</h4>

<p>See Fig. 2. The components of the press machine related to the knockout are the "knockout bar" and the "knockout bar adjustment screw or rod". The field term for this part is ornamental hair pin, or "Kanzashi". Field terms are used in order to avoid the confusion between words such as knockout bar and knockout rod, etc.</br>
The knockout that has been pushed up after the outer shape punching has been completed, pushes up the Kanzashi via the knockout rod (Fig. 2(a)). This position is the bottom dead center of the slide of the press machine.</br>
The slide rises with the knockout in the pushed up state. Near the top dead center, the Kanzashi butts against the knockout bar adjustment screw and carries out the operation of returning the pushed up Kanzashi to its original position, hence the product is ejected (Fig. 2(b)).</br>
The adjustment of the "knockout bar adjustment screw" is something that requires care to be exercised during the operation of the knockout. Near the bottom dead center, if it contacts the Kanzashi too soon, the pushing down length of the knockout becomes too long which can lead to breakage of the die or the knockout. In the case of a top die fixed to the shank, in the worst case, an accident of the top die falling off can occur.</br>
When using the Kanzashi, the knockout bar adjustment screw is raised to the uppermost limit, thereby preventing danger.</br>
The adjustment of the knockout is carried out from this state.</br>
The product that has fallen is made to fly off from the die using means such as an air jet blow, etc.
</p>

<p><img src="http://www.misumi-techcentral.com/tt/en/press/images/154_02.gif" alt="図2" name="image" width="527" height="390" /></p>]]>
        
    </content>
</entry>

<entry>
    <title>#153 Design of Compound Punching Dies (2) Punch-Die Relationship in Compound Punching</title>
    <link rel="alternate" type="text/html" href="https://www.misumi-techcentral.com/tt/en/press/2013/04/153-design-of-compound-punching-dies-2-punch-die-relationship-in-compound-punching.html" />
    <id>tag:www.misumi-techcentral.com,2013:/tt/en/press//4.1065</id>

    <published>2013-04-11T15:00:00Z</published>
    <updated>2013-04-12T00:57:54Z</updated>

    <summary> In compound punching, as shown in Fig. ...</summary>
    <author>
        <name>システム管理者</name>
        
    </author>
    
        <category term="Die Design" scheme="http://www.sixapart.com/ns/types#category" />
    
    <category term="diedesign" label="Die Design" scheme="http://www.sixapart.com/ns/types#tag" />
    
    <content type="html" xml:lang="ja" xml:base="https://www.misumi-techcentral.com/tt/en/press/">
        <![CDATA[
<table width="527" border="0" cellspacing="0" cellpadding="0">
<tr>
<td class="text" align="left" valign="top">
In compound punching, as shown in Fig. 1, the outer shape is punched from bottom towards the top. Hole punching is done conversely from the top towards the bottom. By doing this, the scrap of hole punching falls down. The (shape blanking) product is inserted inside the die which is in the top die. In compound forming such as compound punching, since it is very troublesome to carry out the operations if the scrap is taken up, very often the design is done so that it falls down. It is necessary to eject out the product that has entered into the die. This can be said to be a problem of compound punching.
</td>
<td><img src="http://www.misumi-techcentral.com/tt/en/images/sp.gif" width="12" height="1" border="0" alt="" /></td>
<td align="left" valign="top"><img src="http://www.misumi-techcentral.com/tt/en/press/images/153_01.gif" alt="Fig. 1" name="image" width="250" height="280" /></td>
</tr>
</table>
</br>

<table width="527" border="0" cellspacing="0" cellpadding="0">
<tr>
<td class="text" align="left" valign="top">
Fig. 2 shows the punch-die relationships in compound punching. The parts enclosed in ovals show the respective parts of such relationships. The punch for outer shape blanking is the same size as the product. The punch for outer shape punching is placed below and its die is placed above. The punch for hole punching is placed inside that die. The die for hole punching is prepared inside the die for outer shape punching. A part such as this punch for outer shape punching is called a compound part.</br>
The outer shape is punched from below to above. At this time, a warp is generated so that it gets separated from the punch surface and rises upward, but since the punch for hole punching acts to press from above, in actuality the generation of a warp is suppressed.
</td>
<td><img src="http://www.misumi-techcentral.com/tt/en/images/sp.gif" width="12" height="1" border="0" alt="" /></td>
<td align="left" valign="top"><img src="http://www.misumi-techcentral.com/tt/en/press/images/153_02.gif" alt="Fig. 2" name="image" width="285" height="260" /></td>
</tr>
</table>
</br>

<p>The parts shown here are the primary functional parts of compound punching. To these are added parts such as a stripper, or a part called a knockout which ejects the product that has entered into a die, and all these together constitute a die.</p>]]>
        
    </content>
</entry>

</feed>
