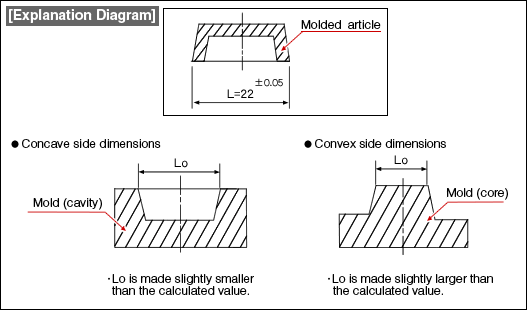
#121 Method of Determining Cavity Dimensions (1)
In the previous lesson we have explained the molding shrinkage ratio and in this lesson we describe a method of determining the cavity dimensions using the molding shrinkage ratio.

Firstly, we determine the molding shrinkage ratio α.
Example: α = 0.005
Next, we select the dimension of the molded article that is to be determined. (When the dimensional tolerance is a ± tolerance value)
Example: 22 ±0.05
Next, we calculate the cavity dimension that is to be obtained using Eqn. 2 below.
L0 = (1 + α) * L ... [Eqn. 2]
Where,
L0: Cavity dimension (mm)
L: Dimension of the molded article (mm)
α: Molding shrinkage ratio
Example:
L0 = (1 + α) * L
= (1 + 0.005) * 22
= 1.005 * 22
= 22.11
Therefore, theoretically the target dimension of the cavity will be 22.11 mm.
In addition, slight adjustment is made in the calculated dimension of 22.11 mm considering machine operability and mold correction after trial fabrication. Although machining a mold component with a width of 22.11 mm is of course possible with the present day machines, since the machining dimensions are specified in units of 0.01 mm and since the machining cost will be high, if possible we would like to round the 0.01 mm part of the dimension to an even number.
Therefore, we correct as 22.11 → 22.10 or 22.11 → 22.12.
Of course it is possible to leave it as 22.11 if we want to machine as precisely as possible.
Finally, when the calculated dimension is on the concave side of the mold, in some cases, the adjustment of the dimension on the convex side is made one more time than in the case of the concave side.
In the case of the concave side, it is also possible to make the dimension slightly smaller so that the mold can be corrected later on.
In this case, the correction is made as 22.10 → 22.08 or 22.12 → 22.08.
The mold is prepared with a slightly larger dimension on the convex side.
In this case, the correction is made as 22.10 → 22.12 or 22.12 → 22.14.
These adjustments are not necessary if it is judged based on experience that the mold need not be corrected.


