#072 Method of Using Standard Components (21) Height Adjusting Unit
Figure 1 shows the condition when a height adjusting unit has been attached to a die.
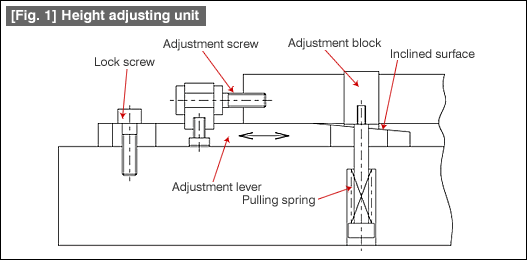
An adjustment lever and an adjustment screw have been integrated in this unit. The adjustment screw has been affixed to a plate in which the adjustment block is present. When adjustment screw is rotated, the adjustment lever moves to the front or back. The front end of the adjustment lever is an inclined surface, and the adjustment block is on that inclined surface. The adjustment block is supported by a pulling spring so that it is kept pushed against the inclined surface.
When the adjustment lever is moved to the front or back the adjustment block moves up or down. This amount of movement is related to the tangent of the angle of the inclined surface. It goes without saying that it is possible to make finer adjustments as the angle of the inclined surface is made smaller. When the adjustment has been finalized, it is necessary to directly fix the adjustment lever by a lock screw. In addition, the groove of the plate in which the adjustment lever enters should have no play, and the adjustment lever should have entered in it completely.
The adjustment mechanism is very frequently used for managing the camber associated with product formation, or warping of the surface, or the depth at the time of marking by punching. It is good if there are as few adjustment parts as possible in a die. However, there are inevitable situations, and the adjustment mechanism is used as a countermeasure. The method of adjusting differs slightly depending on the person making the adjustment. It is necessary to prepare measurement jigs or limit samples, and to take measures so that there will be no differences in the results depending on the individual making the adjustment.

- #167 Problems in Punching and their Countermeasures (6) Scrap Processing in Punching
- #166 Problems in Punching and their Countermeasures (5) Trimming of Drawn and Shaped Parts
- #165 Problems in Punching and their Countermeasures (4) Scrap Clogging in Punching
- #164 Problems in Punching and their Countermeasures (3) Bending and Twisting of Narrow Punched Parts
- #163 Problems in Punching and their Countermeasures (2) Bending due to Punching


Please visit your Regional MISUMI website for additional information or to request our latest catalog.
Unauthorized reproduction is prohibited by all applicable laws and is subject to criminal prosecution.