#135 Design of Blanking Dies (8) and Design of a Fixed Stripper (2)
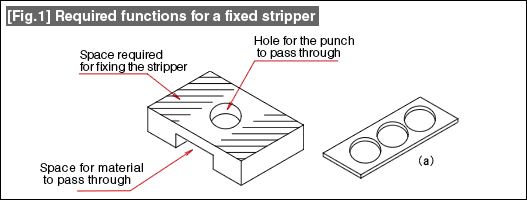
In the last lesson, we discussed the required functions for a fixed stripper and explained that they had to be as shown in Fig. 1. This shape is a basic shape of a fixed stripper, and as is shown in Fig. 1(a), this shape assumes that the blanks are punched in one row with a fixed width of the material.

In contrast with this, there are times when the blanks are to be punched in two rows from a wide material as is shown in Fig. 2(b). In such cases, as is shown in Fig. 2(c), the stripper can also be made to have a single-side holding shape. Although the strength becomes weaker, since the part that is being processed can be seen, there is the advantage that the operations become easy. The disadvantage of a fixed stripper is that the part that is being processed cannot be seen because the stripper acts as a cap on it, and hence sometimes the operator may complain of uneasiness about the operations.

In order to eliminate this disadvantage, as is shown in Fig. 3, sometimes the unnecessary parts are removed thereby making the inside visible. In the case of a relatively small stripper, there will not be much of a load even if parts of an integral stripper are cut away.

However, if the stripper becomes large, this becomes a problem. In such cases, as is shown in Fig. 4, the stripper is prepared by separating the parts of the stripper functions from the parts creating the space for the material to pass through. Although the number of parts constituting the die becomes larger, preparing the parts becomes easier.

The decision of whether to form the stripper in one unit or in terms of divided parts should be made considering whether making the machining easy or the cost is important.
- #167 Problems in Punching and their Countermeasures (6) Scrap Processing in Punching
- #166 Problems in Punching and their Countermeasures (5) Trimming of Drawn and Shaped Parts
- #165 Problems in Punching and their Countermeasures (4) Scrap Clogging in Punching
- #164 Problems in Punching and their Countermeasures (3) Bending and Twisting of Narrow Punched Parts
- #163 Problems in Punching and their Countermeasures (2) Bending due to Punching


