#134 Design of Blanking Dies (7) Design of Blanking Dies
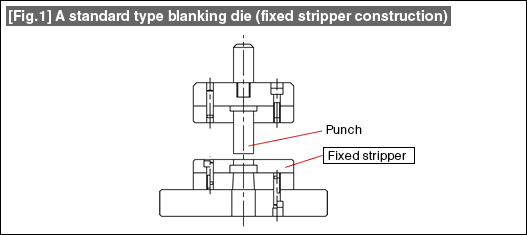
A blanking die of the fixed stripper type is shown in Fig. 1. In this lesson, we will be looking at the role of the fixed stripper of this construction.

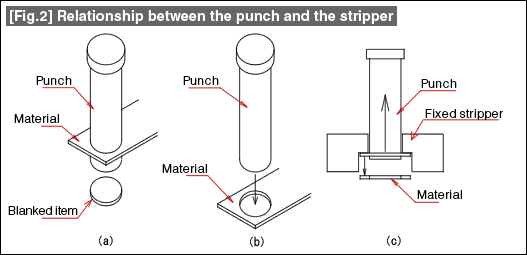
Fig. 2(a) shows the state after the punch has punched through the material. The "blanked item" passes through the die and falls down. The material in which the punch has penetrated through will be in a state in which it is biting the punch. As is shown in Fig. 2(b), it is necessary for the punch to get detached from the material which is biting it. Generally, the material would be biting the punch relatively strongly. The strength of this biting is said to be about 5% of the punching force. It is necessary to remove the punch from the material efficiently. This is done by the stripper. Fig. 2(c) shows an image of a fixed stripper. Since it is easy to scrape off the material using a fixed part (stripper) through which the punch passes and since it is efficient, this is used frequently in blanking dies.

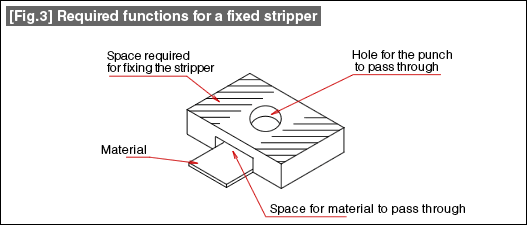
Fig. 3 shows the required functions for a fixed stripper. Firstly, it requires a hole for the punch to pass through. In general, the hole has a size so that the punch can pass through it easily, and it does not require much accuracy. Below the hole for the punch to pass through, a space is required for the material to pass through. Although it is possible to allow for a large space, it is necessary to restrict the width of the material so as to suppress its sideward wavering thereby making the operations easy, and to determine the space in the up-down direction again so as to make the operations easy.

With the consideration of these points, some changes become necessary. These will be explained in the next lesson.
- #167 Problems in Punching and their Countermeasures (6) Scrap Processing in Punching
- #166 Problems in Punching and their Countermeasures (5) Trimming of Drawn and Shaped Parts
- #165 Problems in Punching and their Countermeasures (4) Scrap Clogging in Punching
- #164 Problems in Punching and their Countermeasures (3) Bending and Twisting of Narrow Punched Parts
- #163 Problems in Punching and their Countermeasures (2) Bending due to Punching


