#151 Design of Hole Punching Dies (11) Design of a Hole Punching Die with Several Holes
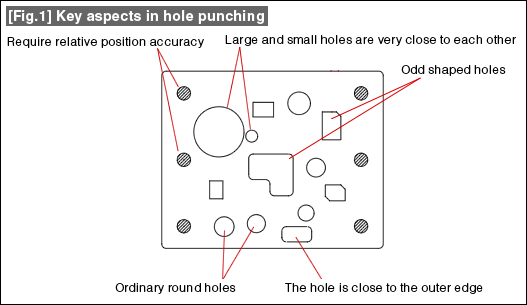
In the case of a product with a number of holes as shown in Fig. 1, there are problems such as that the die gets damaged if it is prepared in one shot. In such cases, the hole punching is done in several steps, and the precautions in such situations are explained below.

When separating the holes for punching,
| 1. | Punch similar (shape, accuracy, etc.) holes simultaneously. | |
| 2. | Combine while considering the strength of the die (proximity, etc.) | |
| 3. | Combine while considering the deformation during hole punching. |
In concrete terms, the holes requiring relative position accuracy are punched as a single group. If they are punched in different groups, the relative position accuracy fluctuates. Put similar shaped holes in the same group. Put all round holes in one group, all angular holes in one group. This is for making it easy to prepare the die. In the case of holes that are close to the outer edge, the outer shape can get deformed due to hole punching. If a large hole and a small hole that are close to each other are punched simultaneously, there is the problem that burrs can get generated easily in the small hole due to the effect of vibrations, etc., of the large hole. When punching holes in several steps, the holes requiring accuracy and the holes that are strict against deformations should be punching in the later steps.
- #167 Problems in Punching and their Countermeasures (6) Scrap Processing in Punching
- #166 Problems in Punching and their Countermeasures (5) Trimming of Drawn and Shaped Parts
- #165 Problems in Punching and their Countermeasures (4) Scrap Clogging in Punching
- #164 Problems in Punching and their Countermeasures (3) Bending and Twisting of Narrow Punched Parts
- #163 Problems in Punching and their Countermeasures (2) Bending due to Punching


