#289 Know-how on automation: Positioning -7
General description
-The previous lecture introduced the precision positioning fixture installed on the microscope table, making the setup changes easier during precision positioning on the microscope. This lecture introduces the simple method of adjusting the perpendicularity against this microscope as well as the perpendicular gauge used for positioning.
Explanation
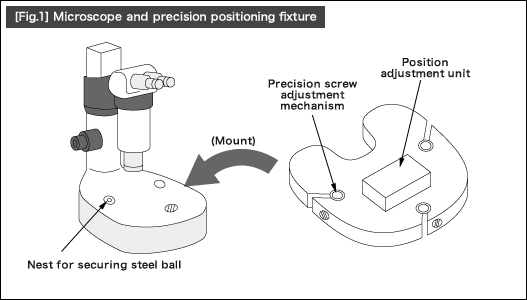
-#288 introduced the precision positioning fixture installed on a microscope for fine-tuning the positions of two components. (Fig.1) In case of multi-model production, setup changes can be done in a short time once a positioning plate designed for each model has been produced.
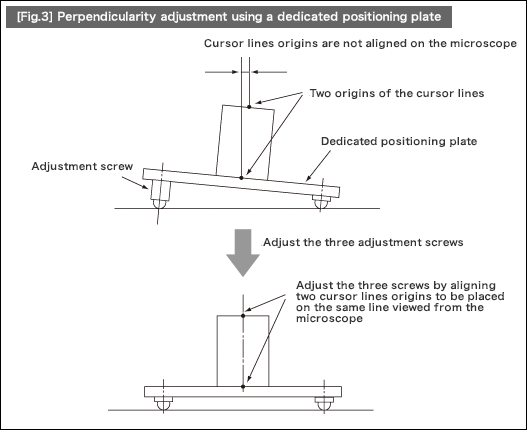
-In this case, the positioning precision cannot be guaranteed without accurately adjusting the perpendicularity between the microscope's optical axis and the datum surface of the dedicated positioning plate for each model.
-On the dedicated positioning plate, the parallel adjustment mechanism using precision adjustment screws is assembled at three locations. These three adjustment screws allow for adjusting perpendicularity against the microscope's optical axis.
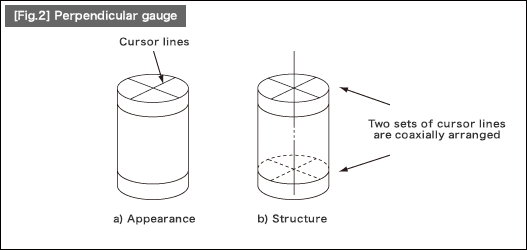
-Fig.2 illustrates a perpendicular gauge used for adjusting the perpendicularity between the microscope's optical axis and the datum surface of a dedicated positioning plate. On this gauge, two pieces of flat glass with cursor lines are placed at a certain distance apart. A virtual line connecting the two origins of the cursor lines is designed perpendicular to the bottom face of this gauge.
-To adjust the perpendicularity between the microscope's optical axis and the dedicated positioning plate, perform the following: Place this gage on the dedicated positioning plate. Move the Z-axis of the microscope to align the two origins of the cursor lines by adjusting the three screws on the positioning plate. (Fig.3)
Precautions
-A microscope usually has a heat-generating lighting unit. The microscope unit undergoes thermal deformation while the light is turned ON. After the light is turned OFF, its thermal deformation state changes. Therefore, the best timing of adjusting the perpendicularity of the dedicated positioning plate is when the microscope's thermal deformation becomes stabilized after a certain time has passed since the light was turned ON.


- Positioning technology
- Designing and processing
- Sensor Technology
- Automation elements technology
- Clean room technology
- Design hints
- Design tips
- Designing and Machining
- Drive mechanism design
- Hints on designing
- Linear Motion Components
- Locating Technology
- Manufacturing technology
- Motion mechanism design
- Pneumatic Drives
- Production Technology
- Technology Outlook
- General description
- Low-cost automation and materials
- Transfer LCA
- #333 Know-how on automation: Pressurized heating technology - 5: Multilayer pressurized heating process technique
- #332 Know-how on automation: Pressurized heating technology - 4: Points to remember when designing mechanism of pneumatic pressurization method
- #331 Know-how on automation: Pressurized heating technology - 3: Pneumatic pressurization method and pressure profile
- #330 Know-how on automation: Pressurized heating technology - 2: Pressurization method and pressure profile
- #329 Know-how on automation: Pressurized heating technology


