September 2010 Archives

#057 Stabilizing the Clamping Force of Single Cavity Mold

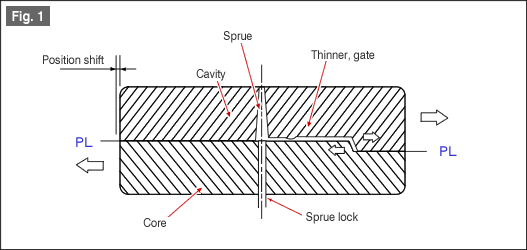
In a single cavity mold, very often the cavity is placed only on one half of the mold plate with respect to the sprue. (See the example in Fig. 1.)
If the size of the mold plate becomes large, since the pressure receiving plate is only on one side, the balance of the mold clamping force becomes disturbed at the time of injection molding, and burrs may appear on the periphery of the molded product.

If the clamping force is set unduly high in order to prevent the generation of burrs in such situations, or if the filling pressure is set lower, it is likely that a different problem occurs in some unexpected part.

[Fig. 1][Fig. 2]

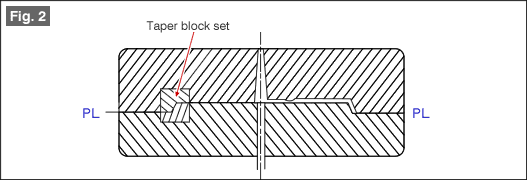
When it is judged that the balance of the mold clamping force is disturbed in a single cavity mold, an appropriate countermeasure is to place a balance block on the symmetrically opposite side with respect to the sprue as is shown in Fig. 2.
Usually, since the parting surface of the cavity and core is projecting by about 5 to 20 micrometers from the parting surface of the mold plate, by placing a balance block, it is possible to put the sealing of the cavity and core parting surface in the desirable condition.

The shape of the balance block can be rectangular or can be circular, and as larger a surface area of receiving the mold clamping force as possible will make the balance more stable.

#056 Preventing the Position Shift of Left-Right Asymmetric Cavities

When the placement of the cavity is left-right asymmetric with respect to the sprue (see the example in Fig. 1), depending on the shape of the cavity, at the time of filling the molten plastic it is possible that a shift occurs in the relative positions of the cavity block and the core block, thereby causing changes in the dimensions of the molded product, or generation of burrs.

Fig. 1

In order to prevent such problems, as is shown in Fig. 2, by placing a taper block set in a direction opposite to that of the cavity carving it is possible to prevent the position shifts.

Fig. 2

In the case of a single cavity mold or a test mold, a situation such as that shown in the example of Fig. 1 can occur. In such a situation, instead of concentrating completely on the preparation of the shape of the molded product, try to look at the overall structure of the mold from a different perspective from a distance, and remember the hints given here.

One can achieve a balanced design if one is not paying attention only to some parts but has the flexibility to view the whole.

#055 Designing the Tip Shape of Pin Point Gate

The problems that can occur in the case of pin point gate structure are the following.

1)The tip of the gate remains as a projection on the surface of the molded product, or scratches out a part of the molded product.
2)The filling does not progress smoothly in spite of the filling pressure or the dwell pressure being high.

These are the problems that a mold designer has to solve whenever adopting a pin point gate.
Some technical measures for solving these problems are described below.

Fig. 1 shows the structure of a general pin point gate. This is the shape when the gate design is made without any special considerations.
On the other hand, Fig. 2 is a design in which measures have been taken to solve the above problems.

Fig. 1 Fig. 2

Key factor 1: Gate land length L

If the gate land length is longer than necessary, at the time of cutting the gate part, it is possible that the gate gets cut in the middle thereby leaving a projection on the molded product.
As a rule of experience, it is recommended that the gate land length L is in the range of about 1 to 2 times the gate tip diameter d.

Key factor 2: Gate opening angle A

As an opening angle, a gate is provided with a conical shaped taper. If it has a conical shape, at the time of cutting the gate, the possibility becomes high that the gate is always cut at the minimum cross-section part where the gate and the molded product meet.
In addition, even releasing from the mold becomes easier. Generally, the value of A is about 15 to 30. Although the cutting becomes definite when the value is large, there is also a trend that the wear of the tip part progresses faster.

Key factor 3: Recess

If the gate is made to penetrate more into the molded product by forming a recess at the surface where the gate meets the molded product, even if there is a projection at the cut part, it will not project beyond the surface of the molded product.
For providing a recess, it is always necessary to get the permission in the drawing for the change in the specifications from the designer of the molded product.

Key factor 4: Dimple

A dimple is a spherical shaped depression provided on the side opposite the gate of the same extent as the ordinary wall thickness of the molded product so that the molten plastic can flow in a stable manner.
Even for providing a dimple, it is always necessary to get the permission in the drawing for the change in the specifications from the designer of the molded product.

In the above manner, if considerations are given in the design aspects, and also, if the gate has been machined accurately using electric discharge machining, etc., there is a very high probability that the above problems are solved.

#054 Mating With Nested Divisions

At the time of assembling nested divisions, unless the dimensions are within controlled nest dimension tolerances, at the time of assembly, it is possible that some parts cannot be inserted into the holes, or a large gap to be present.
"Mating" is a concept of controlling the dimensional tolerances of such matching parts.

As is typified by the relationship between a shaft and its bearings, "mating" is a concept of controlling the permissible dimensional tolerances of the shape of the shaft and the shape of the hole, and the following three are the methods of mating.

(1) Gap mating

This is the method of mating in which there is always a gap in any combination of the shaft dimensional tolerance and the hole dimensional tolerance.

(2) Intermediate mating

This is the method of mating in which a gap may be generated or a tight mating margin may be generated depending on the combination of the shaft dimensional tolerance and the hole dimensional tolerance.

(3) Tight mating

This is the method of mating in which a tight mating margin is present at all times in any combination of the shaft dimensional tolerance and the hole dimensional tolerance.

In addition, there are the two methods 'hole reference method" and "shaft reference method" of machining the hole and shaft that mate with each other of taking either the hole or the shaft as the reference and making the other match with the reference.

In the hole reference method, the dimensional tolerances of the hole are set in advance as the reference, and the dimensional tolerances of the mating shaft are made to match with the reference dimensional tolerances. In this method it is possible to realize relatively easily the desired mating by finishing the dimensions of the shaft accurately.
The hole reference method is very frequently used for the mating of the cavity and core in the molds for plastic injection molding.

In the shaft reference method, the dimensional tolerances of the shaft are set in advance as the reference, and the dimensional tolerances of the mating hole are made to match with the reference dimensional tolerances. In this method, in order to machine the hole accurately to match with the shaft, a milling machine or a jig borer with a good accuracy will be required.

The mating method should be determined by the choice made by the designer of the mold. Which method is to be used for mating with which part has to be decided, and also it is necessary to decide what should be the permissible tolerances.

About this Archive

This page is an archive of entries from September 2010 listed from newest to oldest.

August 2010 is the previous archive.

October 2010 is the next archive.

Find recent content on the main index or look in the archives to find all content.