May 2013 Archives

#159 Design of Compound Punching Dies (8) Design of a Knockout - 3

The method of preventing a knockout from falling down.

In the case of a large product, as shown in Fig. 1, several tapped holes made inside the knockout, and the knockout is held by screwing suspension bolts (stripper bolts) into these tapped holes. If this method is used, the design of the die becomes considerably easy. Even the preparation of the die becomes easy because there is no turning upside down of the die. For the purpose of preventing breakage of the suspension bolts, it is necessary to use as thick screws as possible, and to retighten the bolts frequently. Fig. 1

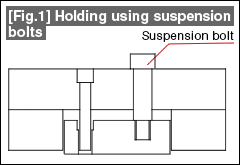
In the case of a round shape or a simple shape, a flange is provided at a part of or all around the knockout and the knockout is prevented from falling down by this flange (see Fig. 2).

Fig. 2, Fig. 3

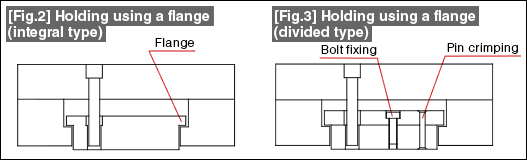
Since a knockout is usually hardened, even the flange part becomes hardened. Since this makes it brittle, if the flange portion is thin, it can easily break due to repeated movements, and hence care should be taken to design the flange to be somewhat thick, and to suppress the hardening to about 56HRC.

If the shape of the knockout becomes complex, the body of the knockout and the flange portion are prepared separately and are used by combining them together. The combining is done using screws if there is enough space for tapping threads. In the case of small shapes, the combining is done by passing a pin through them, and then crimping both ends of the pin.

In this method, the body portion is hardened, and the flange portion is used without hardening thereby taking measures against breaking. If the flange portion is thin, care should be taken because the plate of the flange gets warped with use.

In the method of using a flange, since the strength of the die is affected if the flange is made too big, the size should be designed considering the balance with the size of the product so that there is no excessiveness.

#158 Design of Compound Punching Dies (7) Design of a Knockout - 2

The knockout is always in contact with the blank material. The material is often coated with cutting oil, and due to this oil the material adheres closely to the knockout, and even after the product is ejected from the die it sticks to the surface of the knockout, leading to the problem of double product punching (the problem of punching the material again with a product remaining stuck on the knockout), which can break the die. This phenomenon is a kind of trouble that cannot be prevented even when the operator is being cautious. It is preferable to take countermeasures for this in the structure of the die.

As shown in Fig. 1, adhesion of the material to the knockout is prevented by providing a kicker pin in the knockout. When only one kicker pin is provided, it is positioned at the center of gravity, and when several kicker pins are provided, they are positioned considering the balance among them.

Fig. 1

 The amount of projection of the kicker pin is about 0.5 mm to 1.0 mm. Even when the product is collected using an air blow, since the form in which the product is separated from the knockout is the same, the direction of flying of the product becomes stable. In the case of a kicker pin with a large amount of projection, the tip of the pin can get caught in a hole in the product when the product is flying away thereby leading to an accident. Therefore, it is preferable to use a smaller amount of projection.

It is not good to make the outer shape of the knockout become completely identical to the shape of the die. The metal shreds, etc., that are generated during the punching operation get inside the gap between the knockout and the die, thereby causing fusing between them. This may also cause the movement of the knockout to become not smooth.

As shown in Fig. 2, the guiding is done by a surface with a stable shape (linear parts, etc.), detailed shape portions or corners are provided with escapes by providing R or C chamfering thereby reducing the parts that can cause problems.

Fig. 2

In the escapes for the rounded (R) portions, it is better that the projecting R portions are not escaped by making the rounding R shape small, but by C surfaces. The recess R portions are escaped by providing corners or small R. It is also good to provide escapes in the middle of long straight line portions.

#157 Design of Compound Punching Dies (6) Design of a Knockout - 1

As shown in Fig. 1, a knockout is assembled inside the die. A compound die has the inverted placement structure in which the die for outer shape punching is the top die (goes up and down along with the slide of the press machine) and the punch for outer shape punching is the bottom die (fixed on the bolster plate side of the press machine). A knockout is a characteristic part of this structure.

Fig.1

A knockout has two roles, that is, the role of a stripper of a hole punching punch and the role of ejecting the product that has entered inside the die. Normally, a knockout is prepared with the same shape as that of the product.
As shown in Fig. 2, the surface of the knockout is either made level with the die surface or is made to project slightly beyond it. The amount of projection is about 0.5 mm to 1.0 mm. Contrary to common assumption, it is very rare that its surface is made level with the surface of the die.

Fig.2

When the knockout has moved by the maximum amount inside the die, as shown in Fig. 3(a), care should be taken so that the cutting edge of the die does not get separated, or the stepped part of the hole punching punch does not hit against the reverse side of the knockout.
As shown in Fig. 3(b), when the knockout gets separated from the cutting edge of the die, in some rare cases, the knockout can become immovable because it has got stuck to the underside of the cutting edge of the die, and hence causing the die to break.
In addition, the interference between the stepped part of the hole punching punch and the hole of the knockout can lead to breakage of the knockout or of the punch.

Fig.3

In compound punching, the shape of the product (Fig. 1) and the shape of the compound punching punch (Fig. 2) appear identical to the eye.
The outline shape of the punch becomes the punch for outer shape punching. Relative to the dimensions of the outline of the product, the outline shape of the punch is prepared to be smaller by the clearance between them.
The holes inside the punch are the hole punching dies. They are made smaller by the amount of the clearance with respect to the hole dimensions of the product. The precautions about the drop hole for scrap are the same as in hole punching operations.
Since any scrap getting clogged can immediately cause breakage, the cutting edge of the die is made shorter. When there are several holes that are close to each other, the holes are combined into a single larger hole in the middle so as to make it into a drop hole for scrap and obtaining a structure in which scrap clogging does not occur easily.

Fig. 1, Fig. 2

If the drop hole for scrap is made wide in the case of small shapes, the thicknesses of the side walls become smaller causing the die to break easily. Hence, a countermeasure is taken such as providing a stepped shape as shown in Fig. 3. In the case of odd shaped punches, these are also prepared by chamfering machining or reverse electrical discharge machining. The thinking in this regard is determined according to the design of the punch. Fig.3

A method of fixing the compound punch is to fix using screws by drilling and tapping holes in the punch if the shape is large.
When machined straight by wire electrical discharge machining, grooves are machined in the side walls by grinding, and fixing by keys is done using those grooves, or else, a part of the outer shape is wire-machined large, and that part is later ground to form a flange. The method of fixing the punch is the same as the method of fixing a blanking punch.
The material of the punch is commonly SDK11 heat treated to about 60HRC.

About this Archive

This page is an archive of entries from May 2013 listed from newest to oldest.

April 2013 is the previous archive.

June 2013 is the next archive.

Find recent content on the main index or look in the archives to find all content.