September 2010 Archives

In press dies, for some unknown reason, hexagonal bolts with holes (JIS B 1176) are used as the clamping screws. Hexagonal head bolts and countersunk screws were being used in the olden days, but naturally over time, these have become the standard components. For the descriptions of the detailed standards of hexagonal headed bolts with holes, see the JIS standards or the technical data part of the Misumi catalog "Face".

Unfortunately, there are no documents that clearly describe the method of using clamping screws. Because of this, the designers of dies are forced to worry that they do not this but cannot go and ask for such simple information. Take heart, because everybody is in the same situation in the beginning. One gradually comes to know the method of use.

Coming to the point, the methods of using clamping screws can be divided broadly into two methods, that of plate components and block components.

(1) Clamping screws of block components (nested, punch, etc.)

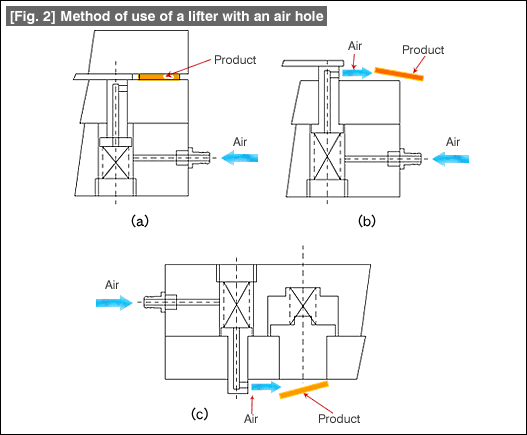
There are a large number of methods of using clamping screws in the case of block components as shown in Fig. 1.

Fig. 1 Screw position patterns for block components

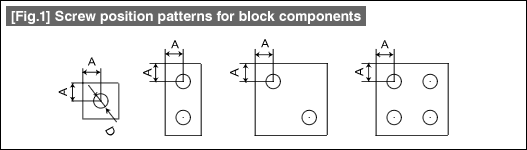
Taking the minimum value of the dimension A in the figure as the screw diameter (D), the thickest screw that can be used is selected from the size of the block (screw breaking countermeasure).
When there are large and small blocks present simultaneously in a die, if the screw size is determined individually for each block, there will be a mix of thick and thin screws, which makes it inconvenient during assembly and disassembly of the die, and hence it is recommended to use screws of the same size.

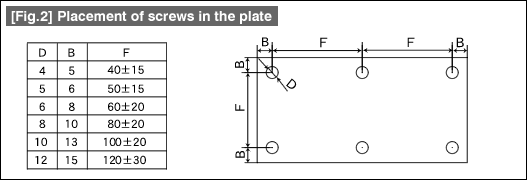
(2) Clamping screws of plate components

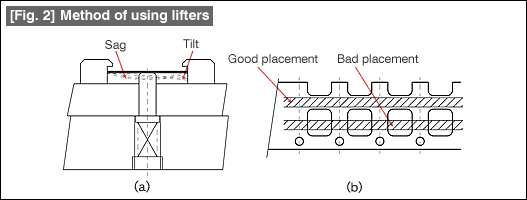
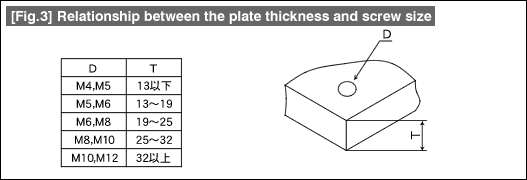
In the case of plate components, as is shown in Fig. 2, the screw size is determined considering the combination of the relationships among the dimension B from the edge of the plate, the pitch F of the screws, and the plate thickness shown in Fig. 3. It is easier to understand if attention is paid to the dimension W of the plate, the dimension B is made about twice the smallest value, and the decision is made considering the relationship between the dimension F and the plate thickness.

Fig. 2 Placement of screws in the plate

Fig. 3 Relationship between the plate thickness and screw size

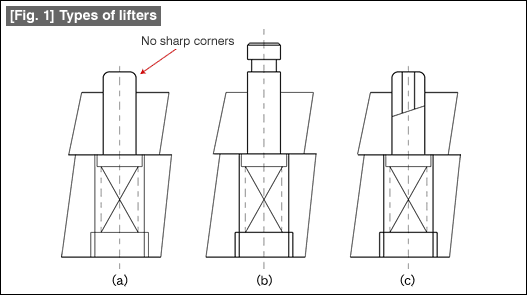
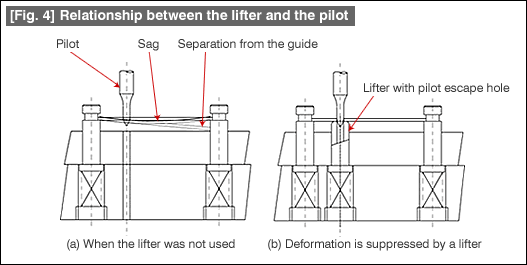
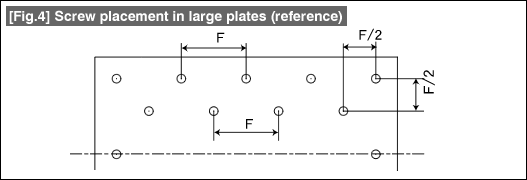
When the plate becomes big, it becomes insufficient to place the screws only near the periphery. In such situations, determine the placement of screws inside the plate such as in the example shown in Fig. 4.

Fig. 4 Screw placement in large plates (reference)

(3) Screw diameter and tap depth

There is a certain depth of penetration of the screw for every screw diameter at which there is no problem in the clamping. This is related to the depth up to which thread tapping is done. In general, the tap depth is taken to be about 1.5 to 2.5 times the screw diameter, the minimum depth of insertion of the screw is taken to be about the same as the screw diameter, and about two times the screw diameter when the screw is inserted deeper. Unless there is some special problem, it can be taken to be a standard of clamping if the depth is more than 1.5 times the diameter of the screw.

#055 Method of Using Standard Components (4) Knock Pin (Dowel Pin)

A knock pin is also called by other names such as a dowel pin. This is used for positioning die components.

A knock pin can be of the straight type or can be of the tapered type as is shown in Fig. 1.

Fig. 1 Shapes of knock pins

Each of these come in tapped types also. According to JIS, this is called a dowel pin for press dies (B 5062, only straight type). According to JIS, apart from this, there is a parallel pin (B 1354) and a tapered pin (B 1352) for machines, but their accuracies are far inferior to those of the pins for dies and molds.

The accuracy of the diameter and the hardness of the material are the important requirements of a knock pin.
A knock pin is used by lightly pushing it in a hole. The retention force of a pin inserted in a hole by press fitting is generated by the surface pressure due to elastic deformation and friction. Therefore, when using a knock pin, the relationship between the accuracy of the diameter of the knock pin and the accuracy of the hole diameter is very important.

While the hole diameter will be slightly smaller than the knock pin diameter for the pin to the push fitted inside the hole, there will be changes in the retention force and driving in force between the raw material and the tempered material unless the hole diameter is changed. The hole diameter is made smaller by about 10m in the case of a raw material and by about 5m in the case of a tempered material.

The basic method of using a knock pin is, as shown in Fig. 2, driving in two knock pins in a plate thereby making sure that there is no position shift. For increasing the accuracy, it is better to make their positions as far as possible.

Fig. 2 Method of using knock pins (surface direction)

Fig. 3 shows the relationship between the pin and the hole.

Fig. 3 Relationship between the diameter and the length of the retaining part

A guideline for the relationship between the hole diameter and depth is that the length of the pin retaining part is about twice the diameter, the minimum length being about the same as the diameter, and the maximum being about three times the diameter. If the hole depth is shallower than the pin diameter, the positioning accuracy becomes poor, and if the depth becomes larger than three times the diameter, it becomes difficult to machine the hole while maintaining the accuracy.

The conventional method of using knock pins is to position two components as shown in Fig. 4(a). However, as shown in Fig. 4(b), although it is possible to use it by passing through three plates, the hole in the middle plate is left free as a dummy hole. Since in this form the middle part of the knock pin is not supported, the accuracy of positioning decreases. Therefore, passing a knock pin through four or more plates should be avoided because of accuracy considerations.

Fig. 4 Method of using knock pins (vertical direction)

Usually, although the straight type is used more often as the method of using knock pins, the tapered type knock pins is also used. Caution should be exercised because there is the danger of their becoming loose due to vibrations or shock.

Further, the method of using in which the pressure applied from the side surface is taken by the knock pins is not the proper method of using knock pins, and there is enough reason to think that it cannot serve the purpose sufficiently.

The method of determining the diameter of the knock pin is based on the size of the clamping screws used along with it. The size used normally is either the same as that of the screws or is a slightly larger diameter.

#054 Method of Using Standard Components (3) Method of Using Lifters with Air Holes

Fig. 1 shows a lifter with an air hole. This is a component obtained by providing an air hole in and a measure to stop the rotation of an ordinary lifter. Fig. 1

Figs. 2(a) and 2(b) show the conditions of use.

Fig. 2

Air is fed from outside to the lifter part. When the die is at the bottom dead center, the air hole is closed automatically since the lifter is pushed up, and hence air does not come out [Fig. 2(a)]. When the top die rises from the bottom dead center, air is blown out from the air hole, and the product that has been cut and separated is blown off [Fig. 2(b)]. At this time, the stopper is still rising. The ejected air flows between the die and the stopper. Because of this, the flow stabilizes and even the blowing off of the product becomes stable.

Although the flow of the air blowing from outside near the top dead center gets dispersed and the flying off of the product is not stable, the above method not only avoids this drawback but also shortens the time required for setting up the die.

Fig. 2 shows the method of use as an air blow in a blanking die or an upward drawing die. Although the name "lifter" gives the impression that it is used in a bottom die, this is a method of use considering it as an air nozzle. Since air is blown near the product, the flying off of the product becomes stable. As was explained above, it becomes unnecessary to set up a separate air nozzle for the product, and the setting up time becomes shorter.

Figure 1 shows the types of lifters. A lifter is a component for supporting the material inside the die so that it does not sag or tilt. A lifter can be of the round type or of the square type.

Fig. 1 Types of lifters

(1) Method of using lifters

Sharp corners are not allowed in the surfaces of lifters that come into contact with the material and these parts should be rounded (see Fig. 1). This is to make sure that no scratches are formed on the material.
In the dies for successive feeding, very often it is necessary to make the material in the die float above the surface of the die. This is for feeding the material. This is also commonly true for transfer dies, dies for robot machining. Lifters are placed in a balanced manner so that the material does not sag or get tilted as shown in Fig. 2(a). The precaution in the placement of lifters in a mold for successive feeding is shown in Fig. 2(b). The lifters are placed and fixed so that they do not interfere with the material during its feeding (the part showing good placement).

Fig. 2 Method of using lifters

(2) Method of using guide lifters

As is shown in Fig. 3(a), guide lifters are components that carry out the functions of both a material guide along the width direction and a lifter. The basic principle is to place them so that there is no sag in the material.
Fig. 3(b) shows the relationship in the up and down directions. When the material is on the die surface, guide gaps of the guide lifter are provided above and below the material as is shown in the figure. If care is not taken about this, the guide lifter can cause crescent shaped scratches or deformations in the material. Sometimes, the material may also be cut in the shape of a crescent moon.
The pressing down of the guide lifter is made at the head part of the lifter. Measures should be taken so that there are no fluctuations in the depth Z machined in the stopper. Take care so that the pushing direction is not tilted because this can cause breakage of the head of the guide lifter.

Fig. 3 Method of using guide lifters

(3) Relationship between lifters and pilots

When forming thin plates, if a pilot enters in the lifted condition as is shown in Fig. 4(a), it causes various problems such as the material sagging or becoming tilted, thereby it can dislodged from the guide lifter, etc. As a countermeasure for this, there are lifters with escape holes for pilots. The material becomes stable because it is supported from below when a pilot enters the material. It is good to use this as far as possible while forming thin plates.

Fig. 4

About this Archive

This page is an archive of entries from September 2010 listed from newest to oldest.

August 2010 is the previous archive.

October 2010 is the next archive.

Find recent content on the main index or look in the archives to find all content.