December 2010 Archives

#065 Method of Using Standard Components (14) Round Punches - 3

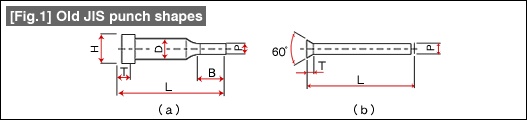
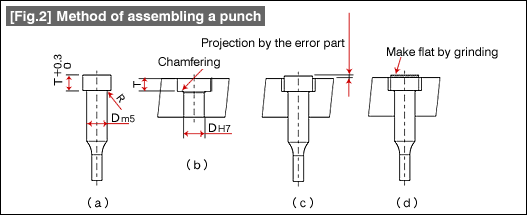
In round hole blanking operation, there is the problem of slug pulling. The easiest method of countermeasure for this is forcibly pushing down the slug that is trying to come up. A punch prepared for this purpose is the ejector punch shown in Fig. 1 (Jector punch in Misumi). Although using the punch is good as a countermeasure against slug pulling, the ejector pin becomes an obstruction while regrinding the punch. Disassembling and removing the ejector pin is very cumbersome. As a countermeasure for this, a hole has been opened at the side of the punch. As shown in Fig. 2, if a pin is inserted in the side hole with the pin pushed down, the ejector pin will remain in the pulled in condition, and hence grinding becomes easy.

[Fig. 1] Ejector punch[Fig. 2] At the time of regrinding the punch

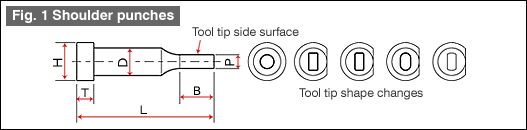
A round punch is used for forming shapes other a round shape. This method is used for the purpose of hole punching of punch plates easy. However, since the orientation will be important if the shape is not round, a rotation stopper will be necessary as shown in Fig. 3. The shapes of rotation stoppers are shown in Fig. 4. The shape (e) can be said to be the basic shape of a rotation stopper. A groove is machined using an end mill, and a pin is inserted in it to make it into a rotation stopper. Adjustments can be made by handling the pin. The shape (d) is one in which the rotation stopper is formed directly using an end mill. The accuracy of the rotation stopper is determined by the accuracy of machining the hole. Although positioning using a rotation stopper looks simple, it is actually quite difficult.

[Fig. 3] Odd shaped hole punch[Fig. 4] Shapes of rotation stopper holes

As a special method of using a round punch, there is the ball lock punch. This is a punch in which the attaching and detaching of the punch can be made with one touch. This is a punch having a groove on the side surface of the punch in which a steel spheres (ball) has been inserted.

[Fig. 5] Ball lock punch

See Fig. 5(a). This punch is used as shown in Fig. 5(b). The punch is set using a dedicated holder called a retainer with a ball held by a spring incorporated in it. When a tensile force acts on the punch, the ball enters into the groove of the ball receiving part of the punch thereby preventing the punch from getting detached. When wanting to detach the punch due to the wear, etc., if a pin is inserted in the hole in the retainer and the ball is pushed up, the punch can be detached easily. The background of creating this kind of structure is that, during the hole punching operations of large components of cars, etc., since it is difficult to take down a large die from the press machine for regrinding the punch, etc., the punch replacement has been made possible in the condition in which the die has been installed in the press machine.

#064 Method of Using Standard Components (13) Round Punches - 2

In the case of the shoulder punches shown in Fig. 1, the standard is such that the parts other than the shank diameter (D) can be changed freely within a certain range.

Fig. 1 Shoulder punches

Even the tool tip shapes can be many. The materials are SKD11 equivalent, SKH51 and powder high speed steel, ultra hard alloys, and it is possible to select the lapping finish of the tool tip part, TiCN and DICOAT processing as the surface coating. It is possible to select low cost components for small quantity production to long life components.

The changes shown in Fig. 2 are available for meeting different applications.
- Items with shortened overall lengths so that they can enter narrow parts inside dies
- Small diameter punches that can work in close proximity to small diameter holes in a narrow range.
- Punches made strong against breakages considering the punching of thick plates.

Fig. 2 Changes from the basic shapes (1)

The changes related to the tool tip diameter and length are shown in Fig. 3.

Fig. 3 Changes from the basic shapes (2)

There should be no problem even if the tool tip diameter and the shank diameter are the same, and such a punch is the straight punch. On the other hand, since even shoulder punches cannot be used because the diameter is small, the number of stages has been increased and the strength is maintained in the 2-stage punch.

The variations in the method of fixing a punch are shown in Fig. 4.

Fig. 4

In addition to the methods of fixing using flanges, screws, and keys, there is a method using a type with a positioning knock as shown in Fig. 4(e). When an attempt is being made to fix an independent punch to a certain part, it is common to think of embedding the punch inside a small block, and installing that block using a knock pin and screws. At this time, the punch positioning accuracy is dependent on the accuracies of the punch hole in the block and knock hole. If the punch and the knock pin are not embedded, it is possible to insert that knock pin directly inside the knock pin hole of the plate, and the accuracy of positioning the punch increases. Since it is sufficient for the block to have only the role of preventing the punch from coming out, a knock hole becomes unnecessary, and it is sufficient to have only holes for the fixing screws.

As described above, round punches have to be used appropriately by making modifications according to the application and purpose of use.

It is also possible to use a shoulder punch by carrying out additional machining. However, if standard components are used as they are while cleverly utilizing various standards, it is possible to reduce the cost and to shorten the time required.

#063 Method of Using Standard Components (12) Round Punches - 1

In JIS standards, round punches are classified as "dies" among "tools" of the category S. The JIS number is B5009. Although initially the name was "round punch for press dies", it has been changed at present to "punch with flange for press dies".

Initially in JIS a total of three types were determined as the standard types from the shapes shown in Fig. 1 with two types from the shape of Fig. (a) and one type from the shape of Fig. (b).

Fig. 1 Old JIS punch shapes

One type from Fig. (a) has all its dimensions determined, with the round tip diameter ranging from 1.0mm to 4.0mm in steps of 0.1mm, and those with higher diameters were standardized up to 24mm with suitable intervals between them. These were the first standardized round punches. Because of the low degree of freedom during use, they have been deleted from the current JIS standards. Another standard is one in which it is possible to select freely the tool tip dimensions with a certain width relative to the shank diameter of the round punch. This is the base for the shoulder punches of Misumi. In the standards of shoulder punches, it is possible to select more types than in JIS.

Even in the standards of the type from Fig. (b) all the dimensions have been determined, and there were standards of diameter from 0.1mm to 4.9mm in steps of 0.1mm. At present, these have been deleted from the standards. Misumi has standards as mini straight punches.

Tolerance in the positive direction has been determined for the thickness (T) of the flange part of Fig. (a). Although initially this was +0.3/0, at present, it has been changed to +0.25/0. The explanation why the flange part is the press tolerance is given

Fig. 2 Method of assembling a punch

Although countersinking is made in the formation of the hole in which the punch enters as shown in Fig. 2(b), countersinking is a procedure that is relatively poor in accuracy. Since it is difficult to eliminate the gap between the punch and the hole, always the assembly should be made so that the flange part of the punch projects up, and after that, as a rule, in the assembled state, the projecting part should be made flat by grinding. (This method of assembling was common when this standard was prepared.) This thinking is still being carried on.

The current JIS standards are of the types shown in Fig. 3.

Fig. 3 Current JIS standards

The number of types has increased, and it appears that it is possible to meet a variety of applications. In addition, although matching with ISO has been implemented, because of that there appears to be some part that is difficult to use. This is the overall length of the punch.

The earlier length standards were 40, 50, and 60, but gradually lengths matching with the standards have come into use, for example, the lengths of 56, 63, and 71, and the lengths 50, 60, and 70 are not present. In the actual practice the previous overall lengths are still being used, and it is convenient because it is possible to specify the length freely.

About this Archive

This page is an archive of entries from December 2010 listed from newest to oldest.

November 2010 is the previous archive.

January 2011 is the next archive.

Find recent content on the main index or look in the archives to find all content.