March 2011 Archives

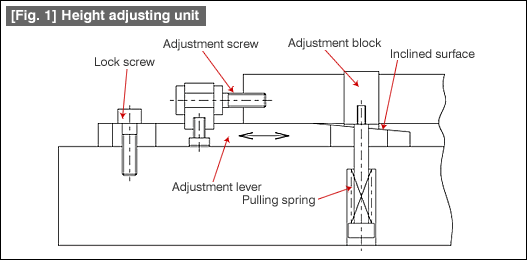
As shown in Fig. 1, the position adjustment of the relationship between the punch and the die is made using a guide for the die set and an appropriate clearance is maintained between them.

Fig. 1 Commonly used movable stripper structure die

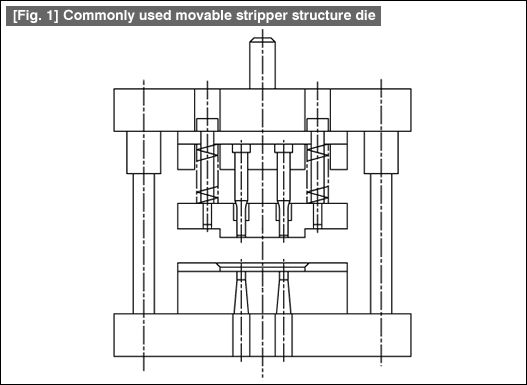
A die set makes it easy to establish the relationship between the punch and the die, and also makes it easy to install the die in press machine. Compared to the age in which die sets were not used, dies have brought in great changes. In a die with the movable stripper structure shown in Fig. 1, the material is kept pressed by the stripper and the pressing is done so that it does not get deformed.

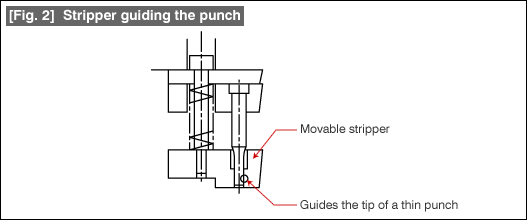
The die structure is used very often in product formation applications that require relatively accurate shapes. In accurate formation, very often the formed shape becomes finely detailed, and since even the punch shape becomes weak, one would desire to strengthen the punch. As an idea for strengthening the punch, as is shown in Fig. 2, a lot of people thought that it becomes difficult for the punch to break if the weak tip of the punch is guided by the stripper and they have implemented this structure.

Fig. 2 Stripper guiding the punch

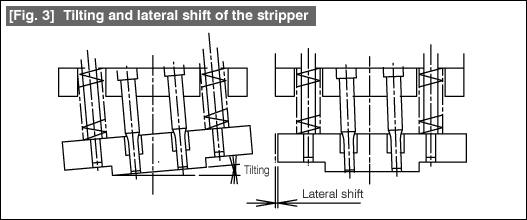
However, in the structure of Fig. 1, there is a movement of the stripper as shown in Fig. 3, and the stripper damages the punch that it is guiding.

Fig. 3 Tilting and lateral shift of the stripper

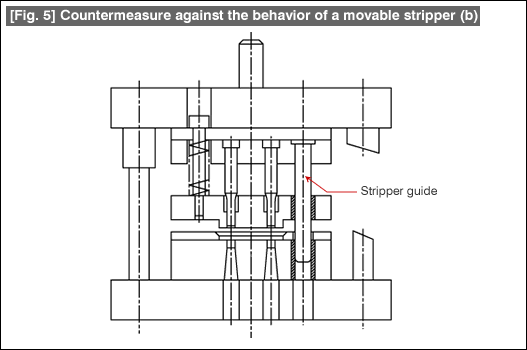
Since the original function of the stripper is to peel off the material that has got adhered to the punch, although there was no problem even if did some slightly strange movement, but in order to guide the tip of the punch, it is necessary that the stripper maintains horizontality and only carries out up and down movement, a stripper guide was placed between the stripper and the punch plate as shown in Fig. 4.

Fig. 4 Countermeasure against the behavior of a movable stripper (a)

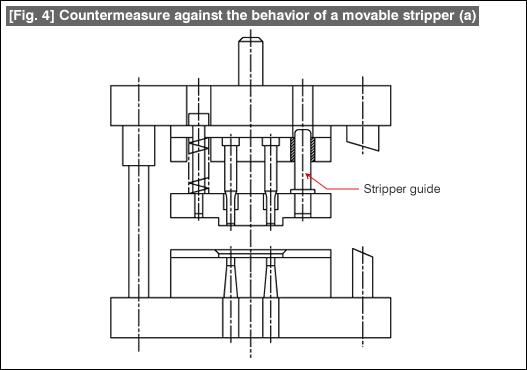
The relationship between the top mold and the bottom mold is maintained by the guide post bush of the die set, and since the stripper guide only restricts the behavior of the stripper it is also called a "sub-guide". When one starts using the stripper guide, the die life gets extended compared to the conventional dies, stable press operation is obtained, and in addition, by making the stripper guide penetrate up to the die as shown in Fig. 5, the accuracy of the die becomes better, and this has become the mainstream punch and die structure for precision forming.

Fig. 5 Countermeasure against the behavior of a movable stripper (a)

#072 Method of Using Standard Components (21) Height Adjusting Unit

Figure 1 shows the condition when a height adjusting unit has been attached to a die.

Fig. 1 Height adjusting unit

An adjustment lever and an adjustment screw have been integrated in this unit. The adjustment screw has been affixed to a plate in which the adjustment block is present. When adjustment screw is rotated, the adjustment lever moves to the front or back. The front end of the adjustment lever is an inclined surface, and the adjustment block is on that inclined surface. The adjustment block is supported by a pulling spring so that it is kept pushed against the inclined surface.

When the adjustment lever is moved to the front or back the adjustment block moves up or down. This amount of movement is related to the tangent of the angle of the inclined surface. It goes without saying that it is possible to make finer adjustments as the angle of the inclined surface is made smaller. When the adjustment has been finalized, it is necessary to directly fix the adjustment lever by a lock screw. In addition, the groove of the plate in which the adjustment lever enters should have no play, and the adjustment lever should have entered in it completely.

The adjustment mechanism is very frequently used for managing the camber associated with product formation, or warping of the surface, or the depth at the time of marking by punching. It is good if there are as few adjustment parts as possible in a die. However, there are inevitable situations, and the adjustment mechanism is used as a countermeasure. The method of adjusting differs slightly depending on the person making the adjustment. It is necessary to prepare measurement jigs or limit samples, and to take measures so that there will be no differences in the results depending on the individual making the adjustment.

#071 Method of Using Standard Components (20) Button Die - 2

Dies are reground when the cutting edge part is worn out (increase in the number of burrs) thereby regenerating the cutting edge. The methods of regrinding a die are - the method of grinding the entire plate and the method of grinding only the insert part. In the method of grinding the entire plate, although the plate becomes thin every time it is ground, there is no particular problem because even the insert parts such as button dies change at the same level. In the method of grinding only the insert parts, it is necessary to adjust the level to which the grinding is made. If this adjustment is not good, undulations appear in the plate surface, and this will affect the product quality. Therefore, as shown in Fig. 1, it is made easy to carry out adjustment of the level of the button dies.

Fig. 1 Level adjustment of button dies

In a button die without a flange as in (a), there is no particular problem because it is possible to adjust by placing a spacer to the extent of grinding. In a button die with a flange as in (b), it is necessary to place a spacer above the flange. While the number of spacers increases as the number regrindings increases, it is not good when they become too many. The spacers should be only up to about 3 to 4, and when their number becomes large, their thicknesses are increased so that their number does not increase.

Next, we discuss the relationship between the hole diameter (d) and the height (L) of the button die. When the dimension L becomes too long compared to the hole diameter, it becomes easy for scrap clogging to occur. Since this problem is particularly easy to occur in the case of small hole diameters, it is good to make it as short as possible. Considering the relationship with other machinings, the plate becomes thick and the length of the button die becomes too long compared to the hole diameter. When it is felt that the balance between the hole diameter and the length of the button die is poor, it may be good to adjust the length of the button die by placing a collar behind the button die as shown in Fig. 2.

Fig. 2 Length of a button die

In hole punching using a button die, very often the hole shape is simple, and there is the trend of easy pulling up of scrap. As a countermeasure, there is a button die that prevents pulling up of scrap. This structure is shown in Fig. 3.

Fig. 3 Button die preventing scrap pulling up

In hole punching operations, there is no effect on the operation even if there is slight change in the clearance of the straight part or curved part shape. Further, shape of the hole punching is that of the punch and the shape of the punched part is that of the die. The scrap pulling up preventing button die is one that has utilized this principle. The clearance is widened at a part of the die and a groove is prepared. This groove is made to be inclined. Many such grooves are prepared. The blanked shape is that of the die cutting edge shape. The blanking scrap moves vertically. Therefore, the projected shape of the inclined groove is a shape that climbs over the inclined groove, and hence increases the biting of the die. This biting force prevents the pulling up of the scrap. However, the effect is small in the case of hard materials such as SK materials or in the case of very thin materials.

About this Archive

This page is an archive of entries from March 2011 listed from newest to oldest.

February 2011 is the previous archive.

April 2011 is the next archive.

Find recent content on the main index or look in the archives to find all content.