February 2013 Archives

#146 Design of Hole Punching Dies (6) Stripper Guide of Hole Blanking Punches

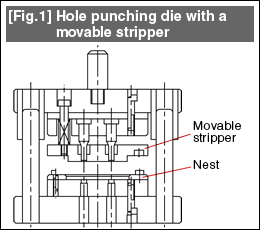
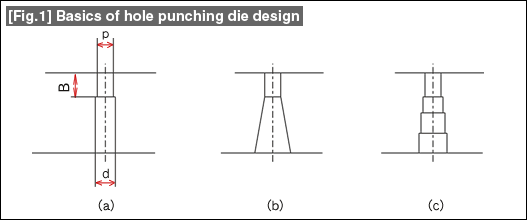
In hole blanking operations, very often a movable stripper is used with the aim of achieving flatness of the product, and a movable stripper structure is established for hole blanking.
When the hole diameter becomes small in hole blanking operations, even the punch becomes weak, and it becomes difficult to maintain the relationship with the die.
In the movable stripper structure, as is shown in Fig. 1, since the tip of the punch is always inside the stripper plate, if the hole through which the punch passes is made small, it is possible to suppressing wavering of the punch, and it is possible to stabilize the relationship between the punch and the die. This is called "stripper guiding the punch" (this is shortened to stripper guide in the following).
If stripper guiding is done in a die with an ordinary movable stripper structure (Fig. 1), the behavior of the stripper plate will be reflected in the punch. This means, the effect on the punch of the horizontal movements or inclinations of the stripper plate.

Fig.1

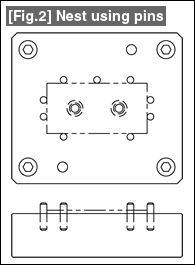
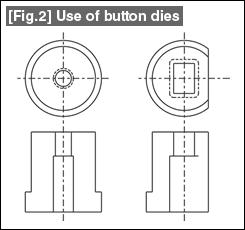
In order to restrict the movement of the stripper plate, an inner guide (stripper guide pin) is provided as is shown in Fig. 2.

Fig.2

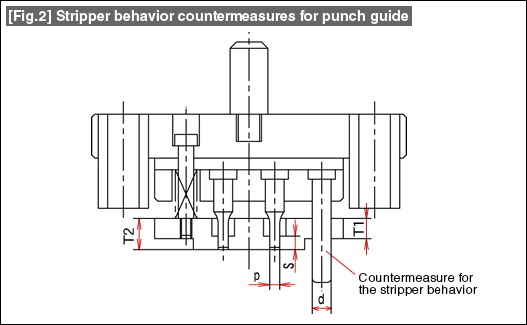
The design of the inner guide is made considering the relationship between the diameter (d) of the inner guide and the thickness (T1) of the stripper plate. The minimum value is d = T1. Any value lower than this makes the punch weak against inclinations.
Very often a step is provided in the stripper plate considering the relationship of the stripper plate with the nest. Care should be taken because the relationship between the diameter and the thickness may be disturbed due to this.

In the case of a hole punching die as shown in Fig. 1, the hole punching is done by placing the blank on the die.
When wanting to maintain the flatness of the product (blank), anybody will think of carrying out the pressing operation while keeping the blank fixed. This is the concept behind the die structure shown here. This is called the movable stripper structure.
The stripper with the role of peeling off the material from the punch is always present on top of the die, and since the punch passes through the stripper, it is ideal for pressing down the blank.
In order to make the stripper movable, the stripper is held at a fixed position by a stripper bolt. The holding position is very frequently such that the stripper surface is 1mm lower than the tip of the punch.
The force with which the stripper presses the material is obtained by a spring. A spring is assembled behind the stripper. At this time, the spring is compressed slightly. The strength of the spring arising out of this compression is called the "initial pressure". The initial pressure is made 15% or more of the hole punching force (this can be 3% or more of the blanking force if it is only sufficient to peel off the material from the punch). The material is pressed with a certain fixed pressing force so that there is no deformation associated with the hole punching operation. This is the purpose of the initial pressure.
Fig.1

See Fig. 2. When the positioning of the blank is done by a plate nest, it is necessary to scrape the stripper surface into a convex shape to match with the shape of the nest.
Very often an end mill is used for machining this shape. The convex shape of the stripper and the shape of the nest are designed so that this machining becomes easy.
The peripheral part called the flange of the convex shape becomes thin due to the machining of the convex part of the stripper. If this becomes too thin, it will affect the strength of the stripper. Determine the thickness considering the balance.
The part shown as the escape in (C) of Fig. 2 is a part that comes before the die. Safety and security during work is obtained by providing this escape.

Fig.2

#144 Design of Hole Punching Dies (4) Design of the Nest of Hole Blanking Dies

Normally, a blanking die carries out the blanking after positioning the blank and keeping it fixed.
This positioning part is called a nest. A nest is called by various names such as "positioning", "guide", etc.

Fig. 1 shows nests using plates. They are also called plate guides.

Fig.1

The nest in (a) is an integral type nest. This type is typically used. The nest in the figure (b) is a divided type nest. This type is used frequently in the case of large products.
A nest is fixed using four or more screws, and are positioned using two dowel pins (knock pins). The fixing method is the same as in the case of a divided nest, in that the relationship between the screw and the dowel pin becomes difficult when the nest becomes small.
In such situations, the minimum possible method of fixing is that of carrying out both fixing and positioning using two dowel pins for one screw.

Fig. 2 is a nest using pins. When a plate is used, there is the drawback that the escape of the stripper plate becomes large.
When a pin is used, not only the escape of the stripper becomes reduced but also it is possible to make the construction of the die simple.
Since positioning using pins becomes point contacts, the positioning accuracy becomes somewhat poor compared to plate guides.
Fig.2

Fig. 3 shows the thinking about designing the shape of a nest.

Fig.3

It is not good to prepare the nest faithfully according to the product shape. Even the positioning accuracy and ease of press operation are not good.
The key aspects of the product shape are taken, and a nest is prepared by escaping corners and finely detailed parts.
In addition, foolproofing is done so that it can be entered only from one side.
Further, do not forget to take measures to make it easy to insert the blank and to provide an escape that makes it easy to take out the product after pressing.

#143 Design of Hole Punching Dies (3) Design of Hole Punching Dies

Fig. 1(a) shows the basic shape of a hole punching die.

Fig.1

Here, p is the die hole. It is made larger than the punch by the amount of the clearance between them. (See Lesson 5 which discusses the clearance in blanking operations.)
B is the part which is called the die cutting edge length. This is determined considering the re-grinding margin.
If we assume that the thickness of the work material is 1cm, the state in which 3 to 4 scraps have got accumulated is good. It is not good if this die cutting edge becomes too long, because it can lead to jamming of the scrap.
Further, d is the scrap ejecting part. It is said that scrap jamming can occur easily when the dimension d is about twice the dimension p.
The countermeasures for this are the shapes (b) and (c). A taper is provided thereby making it difficult for scrap to stick. The shape (c) is one in which the shape is made larger in small steps when it is difficult to machine the taper. This can be said to be a substitute for tapering.

Fig. 2 is a button die. This is used when one does not want to carry out maintenance or hardening of the entire plate.This is also good at meeting changes.
Although this is easy to use in the case of a round hole since there is no orientation, since an odd shaped hole has a proper orientation, it becomes necessary to have stopper for preventing the rotation of the die button.
Sometimes, a square button die is also made considering the difficulties of a rotation stopper and the difficulties of adjustment.
Fig.2

Fig. 3 shows the precautions regarding the relationship with the hole pitch. When there are many holes formed, the error in the pitches between the holes becomes a problem. The problem becomes particularly serious when the work material is thin and the clearance is small. The design of the die is changed considering the machining error of metal working machines, and the deformation due to heat treatment. The decision has to be made of whether to make the die have an integrated structure, or to use a button die, or to use the insert type die and carry out adjustment machining. Fig.3

About this Archive

This page is an archive of entries from February 2013 listed from newest to oldest.

January 2013 is the previous archive.

March 2013 is the next archive.

Find recent content on the main index or look in the archives to find all content.